
Firmware Open Source para ESP32 — GPLv3
Convierte tu ESP32 en un medidor de CO₂ profesional
Sin nube, sin suscripciones. Todo bajo tu control.
¿Por qué medir el CO₂ y la calidad del aire?
🫁 Salud
Menos riesgo de contagios en espacios cerrados. Ambientes más seguros.
🧠 Concentración
El CO₂ alto causa fatiga. Ventilar mejora el rendimiento.
🎯 Control
Datos precisos en tiempo real, sin depender de servicios externos.
¿Qué es CO₂ Gadget?
La libertad de medir tu aire, sin compromisos.
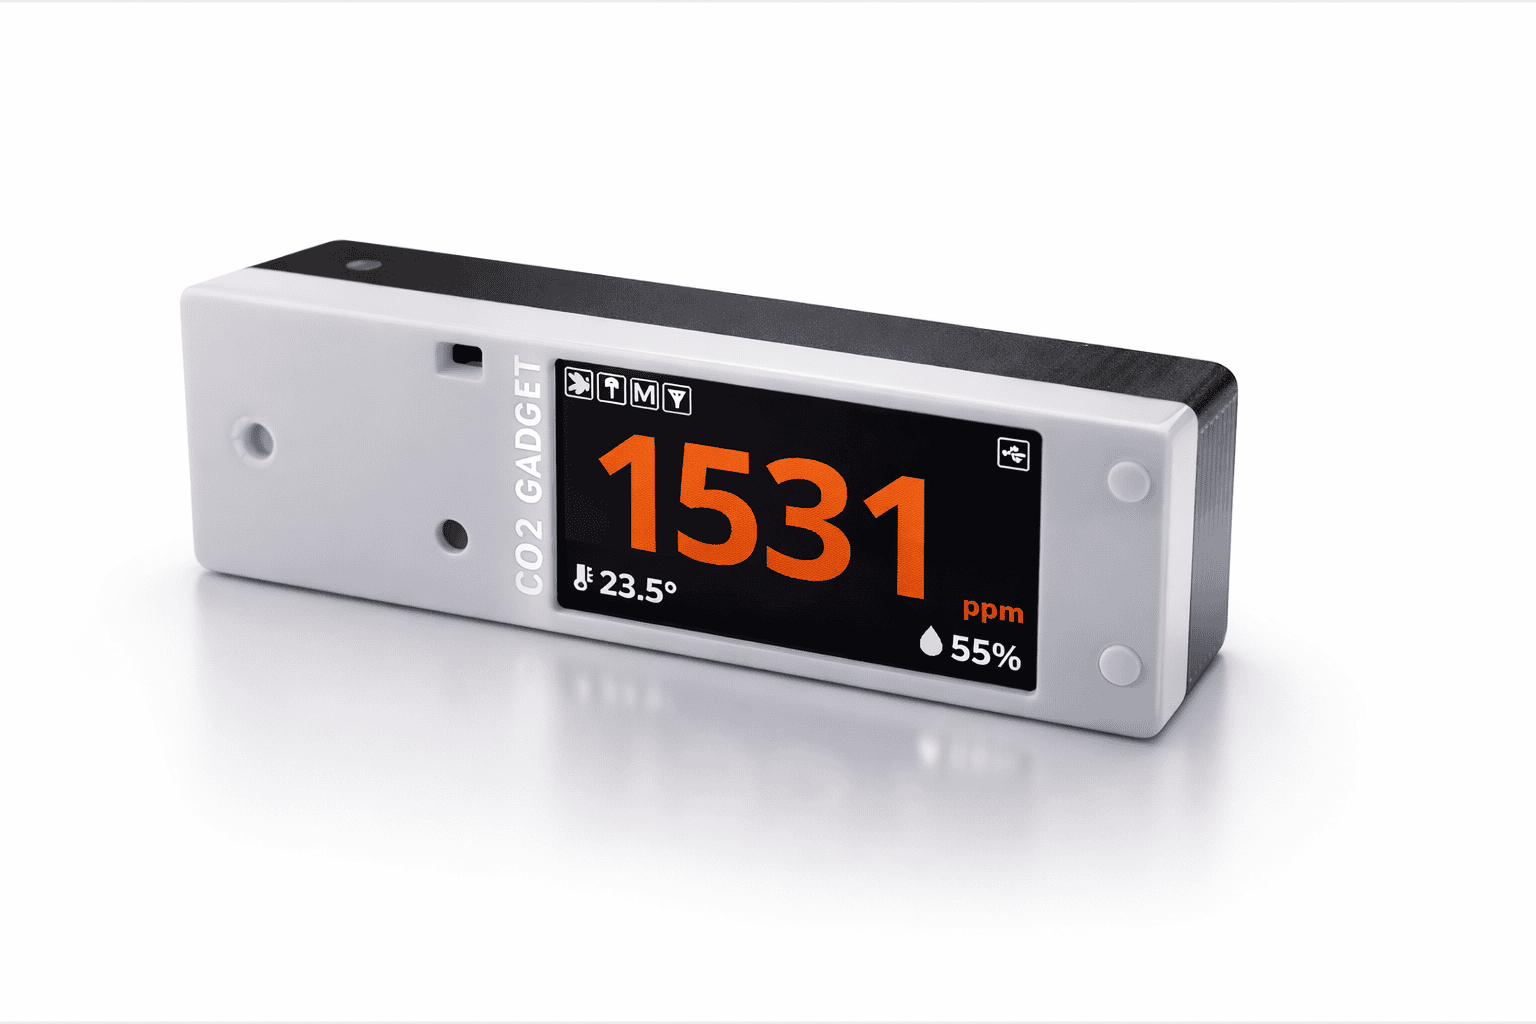
CO₂ Gadget es un firmware profesional para ESP32 que convierte cualquier placa en un medidor de CO₂, partículas y calidad del aire interior de alto nivel.
No necesitas cuentas en la nube, ni suscripciones, ni ceder tus datos: todo se ejecuta en tu dispositivo, en tu casa y bajo tu control. Sin servidores externos.
Es software libre, desarrollado por una comunidad activa, con el mismo rigor que un producto comercial de gama alta. Tú decides qué sensores y qué protocolos usar.
Por qué CO₂ Gadget
🎯 Precisión configurable
- CO₂ NDIR profesional (Sensirion, Senseair, MH-Z19, CM1106)
- Partículas ultrafinas (SPS30, Plantower, Vindriktning)
- VOC, temperatura, humedad, presión
🔒 Privacidad absoluta
- Sin servidores externos ni nube de terceros
- Todo el tráfico es local (WiFi, BLE, MQTT, ESP-NOW)
- Tus métricas de calidad del aire son solo tuyas
⚡ Autonomía de hasta 3 meses
- Deep sleep con solo 10–30 µA en suspensión
- Despierta por CO₂ alto, por timer o con un botón
- Con una batería 18650, olvídate del cargador
🏠 Home Assistant nativo
- Integración automática vía MQTT Discovery, sin YAML
- Los sensores aparecen solos en Home Assistant
- Controla la configuración del dispositivo desde HA
🎨 Interfaz web premium
- Diseño cuidado, modo claro/oscuro automático
- Gráficas interactivas (Chart.js), exportación CSV/JSON
- Calibración web y OTA desde el navegador
📡 5 protocolos de comunicación
- WiFi (REST + WebSocket)
- BLE (GATT + BTHome v2 cifrado)
- MQTT + Home Assistant Discovery
- ESP-NOW peer-to-peer · HTTP API
🤯 CO₂ Gadget vs. medidores comerciales
¿Merece la pena construir tu propio medidor? Los sensores NDIR (Sensirion, Senseair) son los mismos que montan los comerciales de 200€. La diferencia está en el precio, la libertad y las funciones.
| Característica | CO₂ Gadget | Comerciales |
|---|---|---|
| 💰 Precio | ~25–50€ | 69–179€ |
| 🔓 Privacidad y libertad | Open Source, 100% local | Código cerrado, dependen de cloud |
| 📡 Conectividad | MQTT + HA, BTHome v2, API REST | Solo app móvil |
| 🖥️ Interfaz | Gráficas web, exportación datos | Solo app |
| 🔋 Autonomía | Deep sleep, hasta 3 meses | USB fijo |
| 🔧 Flexibilidad | Múltiples sensores, alarmas LED | Un solo sensor fijo |
📖 Análisis completo: ¿Son los medidores caseros tan fiables como los comerciales?
Así se ve la calidad del aire
Tres pantallas, un mismo propósito.
🖥️
TFT a color
Colores vivos, gráficas. Ideal para escritorio.
📟
E-Ink
Legible a pleno sol. Consumo casi nulo.
📱
Web UI
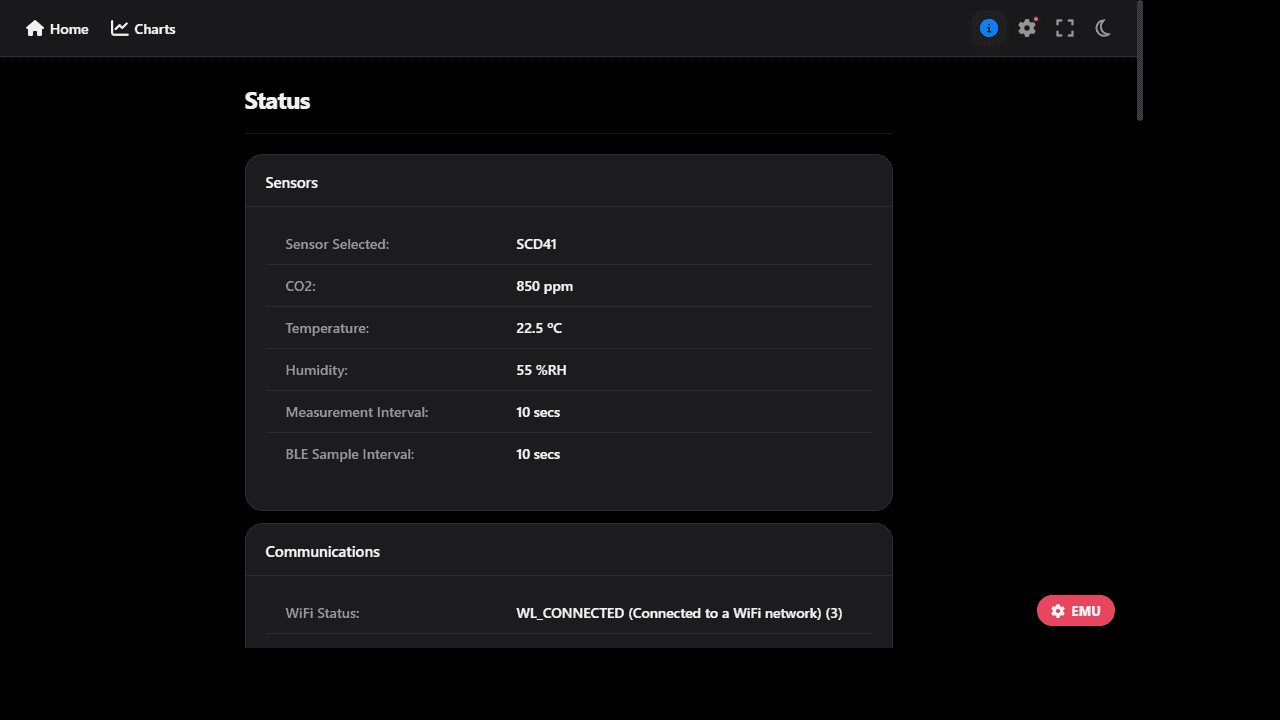
Gráficas, configuración y OTA.
Para cada espacio, una solución
CO₂ Gadget se adapta a ti.
🏡
Hogar
Ventila cuando toca. Máxima autonomía.
🏫
Colegios
Alarmas visuales y sonoras. El CO₂ alto no pasa desapercibido.
🏢
Oficinas
Red ESP-NOW + gateway MQTT. Sin infraestructura WiFi.
🔧
Makers
El firmware más completo para ESP32.
📊
Integradores
API REST con 40+ endpoints.
Instalación en 3 pasos
Solo un navegador Chrome o Edge y un cable USB.
01
Conecta
Tu ESP32 al USB. Elige tu modelo.
02
Instala
Un clic desde el navegador. El firmware se flashea solo.
03
Disfruta
Conecta sensores, configura la WiFi y empieza a medir.
Especificaciones técnicas
Para quien necesita los detalles.
| Sensores CO₂ | SCD30/SCD40/SCD41, Senseair S8 LP, MH-Z19, CM1106 |
|---|---|
| Partículas | SPS30, SN-GCJA5, Plantower, SDS011, Vindriktning |
| Ambientales | BME280, BME680, SHT31, AHT10, BMP280 |
| Pantallas | TFT color, OLED, E-Ink (2.13″–2.9″), headless |
| Protocolos | WiFi · BLE + BTHome v2 · MQTT · ESP-NOW · HTTP API |
| Bajo consumo | 10–30 µA · Wake por CO₂/timer · 3 meses con 18650 |
| Salidas | GPIO relés, NeoPixel RGB, buzzer, alertas MQTT/BLE |
| Calibración | FRC, presión, ABC, web y MQTT |
| Placas | 13 variantes: TTGO, T-Display S3, ESP32, LilyGO, WeAct |
Home Assistant, sin esfuerzo
CO₂ Gadget se integra con HA de la forma más elegante: aparece solo.
MQTT Discovery automático, sin YAML. Los sensores aparecen solos. Control desde HA.
¿Prefieres BLE? BTHome v2, cero configuración.
🏠
Works with Home Assistant
MQTT Discovery · BTHome v2 · REST API
🔋
Hasta 3 meses de autonomía
10–30 µA en reposo · Wake inteligente
Medir sin ataduras
No es un simple deep sleep: es un sistema inteligente que decide cuándo medir, cuándo despertar la pantalla y cuándo enviar datos.
Configurable desde la web. ¿CO₂ alto? La pantalla se despierta sola.
¿Qué protocolo usar?
Cada escenario tiene su protocolo ideal.
🏠 Tengo Home Assistant
→ MQTT con Discovery. Sin YAML.
📱 Solo móvil, sin WiFi
🔄 Varios dispositivos
→ ESP-NOW, sin infraestructura.
⚙️ Integración custom
🔋 Máxima autonomía
📚 Guías principales
Un proyecto vivo, hecho por y para la comunidad
Código abierto, en evolución constante, con comunidad activa.
v0.16.015-beta · BTHome v2 · Modo binario · MQTT Discovery · Calibración web
CHANGELOG →
Empieza a medir tu aire hoy
Sin cuentas, sin suscripciones, sin nube.
Genial, como siempre, cuando llegue a casa lo grabo a ver que tal, saludos
👌
Hi,
Very impressed by your gadget. I am using MH-z19 CO2 sensor and not sensirion. How could I activate it?
Thanks
Hi Frédéric.
Flash the version Beta-Development (https://emariete.com/en/meter-co2-gadget/#Version_sandwich_Beta-Desarrollo)
Connect MH-Z19 pin RX to 12 and TX – 13
Select in CO2 Gadget’s menu “Configuration->CO2 Sensor” MH-Z19
Your test will be very welcome as this functionality for serial connected sensors is tested with Senseair S8 and Cubic CM1106 but we miss a test with MH-Z19.
This beta is temporal for testing, as support for serial connected sensors is in testing, and this will be included in the normal version in the next few days…
Please, if you find any issue with this beta report at: https://github.com/melkati/CO2-Gadget/issues
Hi Mariete,
I am using the T-Display board, one of my buttons is broken. I am using the Serial Monitor to enter information. In the WiFI menu, how do I clear data so I can enter my home SSID/PW?
SSID: You must enter the SSID, the “name”, of the access point you want the CO2 Gadget to connect to.
I don’t see a method to clear the previous entry.
Thanks for the wonderful Tutorial and your software!
Hi Joe.
You don’t need to clear the previous data. Simply type your SSID/PW overwriting the old value. If the old value was longer than the new data you can simply overwrite the rest with spaces (CO2 Gadget will clean the leading spaces on save).
Thanks so much, that worked!
Estimado Mariete:
En la sección “Características destacadas de CO2 Gadget” se escribió de manera incorrecta el nombre de la aplicación gratuita de calidad del aire “Sensirion MyAmbiance”
Debe decir “ Sensirion MyAmbience”
https://apps.apple.com/mx/app/sensirion-myambience/id1529131572
Gracias por compartir este proyecto tan útil y necesario para evitar contagios de #CoViDIsAirborne.
Hola JeanMichel.
Muchas gracias por el aviso. Ya está corregido.
Un saludo.
Hi,
First of all thank you for the nice work and effort you put into this project!
I can confirm that it works with the CO2 Sensor» MH-Z19. (esp32dev_OLED) I’m using you’re latest version 5.0.41.
I have some questions about the Neopixel led, I can’t get it to work on pin26. The individual (green P25, yellow P32, red P33) leds are not a problem.
Also the 2 push buttons on pin 35/34, I can’t get to work. Pin 34 is also used for the battery?
(tried with pin0 but also nothing). Controlling the menu with serial commands for the moment. Can you please tell me what I can try next?
One final question, if I understand correctly only co2 sensors are supported for the moment? Because on your github page there are some pm and environmental sensors supported. If needed I’m willing to try some.
Hi Bart.
The support for Neopixel is not in the latest release yet, it’s still in a private beta (I was just documenting it yesterday). Will be released over the weekend.
Let me fix the buttons issue, please. I hope it will be fixed today.
Support for PM 2.5 is coming. I’m waiting for a fix in a third-party library. I guess it will be ready soon.
Best regards.
Hi Bart.
While I have time to do some tests and include it in the next release, I just left for you a “Beta-development version” versión with:
– Support for Neopixel
– Buttons on pins 35 and 0
Please, test and report if it’s working fine so I can include on regular release.
Look above for the “Beta-Development Version” (https://emariete.com/en/meter-co2-gadget/#Version_Beta-Desarrollo)
Hi Mariete,
Thank you again, also for the very fast response.
I tried the Neopixel part. It’s working but I have the wrong type of pixels because the colors are wrong 🙂 Green is red and vice versa.
I cannot conform button p36 because my esp32-wroom version doesn’t have a pin 36.
I’m also testing the TTGO_TDISPLAY version with Sensirion SCD30.
If you need more testing I can help you with that but I’m not a guru like you.
Hi Bart.
I had no time to test the Neopixel LED myself. Maybe, it’s a bug. I’ll try to test it as soon as possible with some original WS2812B (hope today, tomorrow at most).
Please, try again the updated version with buttons on pins 35 and 0. I realized it makes no sense to have buttons on different pins than those of TTGO T-Display for the “generic ESP32 flavor”.
Please, check (on display or serial terminal) that the loaded version shows, at least, “v0.5.047-feature-neopixel” as there are situations where server or browser cache can serve an outdated version.
Any testing with new versions is very welcome as I have no time to test each version with different hardwares.
Thank you for your kind words. No, I’m not a guru! 😀
actually there are lot of flavors of ws2812b led chips/strips, so controllers usually have settings to switch rgb/gbr/brg and other combinations…
Thanks, Jakub.
The only addressable LED introduced right now in this precompiled beta is the original WS2812B. In future versions there will be more addressable LED supported but, before introducing the needed code to select and including it in the menu, I prefer to have some feedback with the original WS2812B, as it’s the most widely used and the only one I have.
Internally CO2 Gadget support many different addressable LEDs (all the Adafruit library supports). So, you can compile your own version supporting any other with just one line change in code.
Right now, the issue Bart is having can be a bug where I drive the wrong color, as I didn’t had the time to test it myself.
Here I’m back with an update. I hope that you like the feedback.
It’s tested with the latest beta version v0.5.047 as stated in the menu.
I tried the buttons, button P0 is working perfect but P35 doesn’t.
I will try another esp32 to rule this out.
As jakub said my Neopixel “problem” will probably be the flavor rgb/gbr/brg.
Is it possible there is a bug in the menu for the display?
menu (4) configuration – (7) Display Config – (2) Time to off.
If I change this other then 0.
I get error unfunctional, TO DO Main turning off display to save power.
I also tested the TTGO T- normal version with the Sensirion SCD30.
I like the color tft. Can I ask what offset you use for the temperatur?
Tested the app (not in detail yet), wifi all looks fine.
The MQTT part is next. I try to test as much as possible for you.
I have esp-easy firmware with a Sensair S8 next to it but the value of the co2 is roughly 100ppm different than the SCD30.
Going to put a MH-Z19 with CO2 Gadget side by side to compare all three.
Hi Bart.
Thank you very much. This feedback help me a lot to improve CO2 Gadget and fix things.
I will build a rig with OLED to test the buttons and some other things (I don’t have one built right now for testing). Have you checked (on display or serial terminal) that the loaded version shows «v0.5.047-feature-neopixel»?
I plan to add over the weekend the LED configuration to the menu so it’s possible to select RGB, GBR, NEO_RGBW, etc (there is a place where you can see the “status”: https://github.com/melkati/CO2-Gadget/issues/72)
The issue regarding the “(4) configuration – (7) Display Config – (2) Time to off” problem is because the OLED support, right now, is very limited. Here you can see whats pending to do: https://github.com/melkati/CO2-Gadget/issues/51
The temperature offset depends a lot on enclosure, TFT brightness, etc. with the compact enclosure in a sandwich configuration I have an offset of 13ºC
My S8 and SCD30, when in the range 400 to 1000ppm, usually are within 50 ppm one of another:
If you check on LOGS & CONSOLE
and then click on RESET DEVICE you can see the first log messages where the version information is:
Hi Bart.
There is a new «Beta-Development Version» (https://emariete.com/en/meter-co2-gadget/#Version_Beta-Desarrollo) that adds a configuration menu (“Neopixel Config” under “Configuration“) to choose one of the supported Neopixel types (I’ll add more in the future) and brightness.
Please, after updating make sure it show, at least, “CO2 Gadget Version: 0.5.049-feature-neopixel Flavour: ESP32 OLED“.
Hope it fixes issues with your Neopixel flavor. Please, give me feedback when you have the time to test.
Hi Bart.
The issue with button UP connected to GPIO35 should be fixed now with the new release v0.5.069.
The issue was, probably, that you didn’t have a pull up resistor connected to the UP button. It’s fixed now by changing button UP to GPIO15 without needing any resistor. I had to change GPIO as it has a internal pull up (old GPIO35 doesn’t have internal pull up).
Please, if you find any problems, open an issue at CO2 Gadget GitHub repository by pressing green button “New issue“.
hello,
thanks for great work man.
I made my printed box bigger to fit 18650 cell inside.
When I try to download history using sensirion app, download state is stuck at 0%, have anyone experienced that?
Great! 😀
Will you be sharing the box design? I’m preparing a post with some different enclosures so each user can choose the best for him depending on sensor, display used, battery, design preferences, etc. There are already a few of them users sent me, some on Tinkercad.com, so other users can modify to their needs, some others on Thingiverse.com.
Regarding the download from the App, may be it’s a bug introduced in one of the last versions. Could you open an issue for this at GitHub, please?: https://github.com/melkati/CO2-Gadget/issues
case with holes for mh-z19 sensor is here https://www.prusaprinters.org/cs/prints/115651-simple-co2-meter-and-logger-ttgomh-z19
Great, nice case! Thank you! 😊
I’ll prepare a post on the blog over the next few days with all the available cases for CO2 Gadget and will include these. 👍
now I realized that I am using mh-z19b which needs 4,5-5,5V and using the battery it gets only 3,6-4,2V depending on state of charge. I tryied powering it using powebank, I measured 4,7V on pins, and values were the same (tested at 500 and 1500ppm level) as from the 4V battery. Do you think it is crucial? I read your article about mh-z19c, which is more picky about the voltage.
Hi Jakub.
The CO2 sensor’s power supply is extremely important to have good readings.
Not only the voltage must be within the specs indicated by the manufacturer but also, the voltage must be stable. You should not power a CO2 sensor directly from the battery because as the voltage drops as the battery discharges the measurements will change.
Actually, you must calibrate the CO2 sensor at the voltage it will be used later. If you calibrate the CO2 sensor at one voltage and later, you use the sensor with a different voltage the measurements will be wrong.
The solution to use 5V CO2 sensors on battery is to use a “step up module”. More on this here: Adding battery charger to ESP8266 and ESP32 (well done)
I hope this information is useful to you.
I see, thank you, I will use step up, I have some laying around
Hi Jakub.
Issues with downloading of historical data to MyAmbience App should be fixed now with the new version v0.6.000
Descargo las fuentes, para usar con Arduino Ide, y me da muchos errores de includes rotos.
Imposible de Compilar y subir.
Hola Chema.
No falta ningún fichero, todo está en el repositorio de CO2 Gadget en GitHub..
Como se explica en las instrucciones y en los comentarios del código, actualmente ni el código está preparado para compilar con Arduino IDE ni las instrucciones están actualizadas. Si quieres compilar con Arduino IDE, tendrás que resolver includes, dependencias y defines tú mismo.
Cuando el código sea más estable y tenga menos cambios adaptaré el código y escribiré las instrucciones para compilar con Arduino IDE (ahora mismo se modifica muy a menudo con bugfixes y nuevas funcionalidades y me quita mucho tiempo estar pendiente de mantener la compatibilidad con Arduino IDE).
Te recomiendo que utilices VS Code con PlatformIO. En internet tienes muchos tutoriales y no es tan difícil en absoluto como parece.
Hey Mariete,
I like your Project really much.
I want to go on with it on my own, but I am not able to upload the code in arduino IDE, because there is a file missing:
#include
Can you tell me, where I can get the file and where to put it? I am trying the last version from GIT.
I am planning to build more of the devices and to send the data to a database from where I want to go on…
Hi Tim.
There are not files missing, everything is at CO2 Gadget’s GitHub repository.
As explained in the instructions and in the code comments, currently neither the code is ready to compile with the Arduino IDE nor the instructions are up to date. If you want to compile with the Arduino IDE, you will have to solve includes, dependencies and defines yourself.
When the code is more stable and has fewer changes, I will adapt the code and write the instructions to compile with the Arduino IDE (right now it is modified very often with bugfixes and new functionalities and it takes me a lot of time to be aware of maintaining compatibility with the Arduino IDE).
I recommend that you use VS Code with PlatformIO. On the internet you have many tutorials, and it is not as difficult at all as it seems.
Hi,
I have tested the Version: 0.5.049-feature-neopixel Flavour: ESP32 OLED (empty> flash)
The Bright settings work.
I can clearly see the setting changing the led from red to green and vice versa but saving the settings and reboot puts the led back to red when it should be green. After checking the settings again after the reboot they are correctly saved. (I have the rgb version). If I toggle them again, it gets the correct color again.
I also have the rgb leds connected. I see 700 orange, state in between orange and green. >1000 I have orange and red. But only red I don’t have.
If you want pictures or something, just let me know where to send them.
The Bright settings work.
Hi Bart.
Thank you for your feedback. It’s unbelievably valuable to me.
So, looks like it’s not applying the saved configuration at startup. I’ll fix this in the next version.
Regarding the RGB LED not turning off the orange when turning on the red, it is normal, as these outputs double as relay outputs. If you look in the FAQ at the point “Can CO2 Gadget turn ventilation equipment on and off?” the orange output is not turned off when red goes on (to keep ventilation or air cleaning equipment working when CO2 rises). To fix it when working with LED I’ll include a new option in menu to select if these outputs should work in “relay mode” (keeping orange on when red goes on) or “LED mode” (turning orange off when red goes on).
Hi Bart.
There is a new CO2 Gadget version released (v0.5.069) that should fix both problems.
Please, if you find any problem open an issue at GitHub so it can be fixed: https://github.com/melkati/CO2-Gadget/issues
Best regards and thank you for your feedback.
Hey Mariete, nice project and got the waffled version running. I had some issues though on flashing from a MacBook where I moved to Windows laptop it was swifltly flashed. The LiPo battery as well: learned that batteries are not all the same size …
Question: to try to extend battery life: can you share the BLE message format? That way I could just read the BLE message into my home automation.
Regards, Wim
Hi Wim.
CO2 Gadget uses Sensirion’s Arduino BLE Gadget Library.
Everything is published at CO2 Gadget’s GitHub repository. Go ahead and look at the source code.
Hi Mariete,
It seems that there is a limit for the length of the wifi password (around 28 caracters). My password is rather long with 37 car and I can’t have a wifi connection. Do you confirm this limit. How to overpass it ?
Anyway, you have done a wonderful job !!!
laurent
Hi.
Thank you for reporting this.
Yes, the actual max password length is around 30 characters.
I will increase the length as to the maximum password length standard that allows a max length of 63 characters.
I hope to have this fix ready very soon. See for updates: https://github.com/melkati/CO2-Gadget/issues/86
Best regards.
Hi,
Is it possible to integrate this CO2 project into Home assistant ?
I know that it is possible to use SCD30 with ESPHome, but it is not possible to manually calibrate the sensor with ESP Home, whereas it is possible with your project.
Regards
Hi Romain.
Yes, it’s possible.
The best option is to integrate it via MQTT as its supported by both, Home Assistant and CO2 Gadget, and it’s really powerful and simple to setup and use.
I used step-up so voltage is stable 5V, but now I don’t know when battery is going to die, TTGO is showing 5V all the time. We could use some analog in pin to show real battery voltage, or maybe, use step up only for powering the CO2 sensor and feed TTGO battery voltage?
Hi Jakub.
Yes, it’s better to use the step up only for powering the CO2 sensor (saves energy that way also).
Hi,
I don’t understant, I can enable Wifi on my ESP32 with the OLED version firmware. I have this error :
[WiFi-event] event: 5 – Disconnected from WiFi access point
I enter my Wifi SSID and the correct password.
Do you have any ideas ?
Thanks
Hi Romain.
Don’t know what the issue can be here, nobody reported this before. Better open an issue at GitHub as this will need more investigation…
SCD41 running just fine. On the Comm output, I see this:
–>[SENS] CO2: 1459 CO2humi: 29.81 CO2temp: 32.04 H: 0.00 T: 0.00
–>[SENS] CO2: 1458 CO2humi: 29.97 CO2temp: 32.08 H: 0.00 T: 0.00
What is H: 0.00 T: 0.00? I don’t know what to look up since I don’t know what it could be.
Hi Mike.
CO2 Gadget supports external temperature and humidity sensors (apart from the integrated sensors in the, in you case, SCD41). H: 0.00 T: 0.00 shows data from these external sensors. In your case it’s zero because you don’t have any connected.
I know you use the external library for sensor support but have you seen this..
Sensirion SEN5x Environmental Sensor Node : https://www.mouser.co.uk/new/sensirion/sensirion-sen5x/ PM, NOx, VOC, RH, and T all-in-one package.
It would be awesome to see it working with this project!!
Hi jr.
It’s a nice sensor.
Support for PM sensors in CO2 Gadget is planned. I can’t include it now as I don’t have one of these sensors. If anyone wants to donate a sensor (or make a pull request to include support for it) I’ll be more than happy to include it.
Very nice project, hats off to you!
Got a couple of questions:
1. The questions in the FAQ on this page cannot be expanded. Nothing happens when I click them. I tried in Edge and Firefox, both normal and inprivate mode. Is it broken?
2. Where can I find how to connect a MH-Z19 and a BME280 sensor?
Hello,
This is an amazing project !
Sorry If I missed this information, but I was looking for the wiring diagram.
My plan is to use a MH-Z19C with a TTGO T-display, a BME280 and a WS2812B LED, would this be possible?
Thanks !
Configuration web page
In addition to being able to configure CO2 Gadget via its display and serial port, it is possible to change the options via its website.
Hi,
I would like to open the configuration webpage, where can I find it?
Hi Peter.
You can access to it at:
http://device_ip/preferences.html
or
http://device_name.local/preferences.html
Best regards.