
Contents
- 1 CO2 Gadget highlights
- 2 Who is CO2 Gadget aimed at?
- 3 What do I need to build CO2 Gadget?
- 4 CO2 Gadget use
- 4.1 Bluetooth operating mode
- 4.2 WiFi operating mode
- 4.3 ESP-NOW operating mode
- 4.4 Activation of ventilation equipment (relay outputs)
- 4.5 RGB LED notifications
- 4.6 Neopixel LED Notifications (WS2812B)
- 4.7 Buzzer alarms
- 4.8 Communication of the CO2 meter by MQTT
- 4.9 Discovery MQTT for integration with Home Assistant
- 4.10 Sending measurements by MQTT
- 4.11 Receiving commands via MQTT
- 4.12 Alarm sending by MQTT
- 5 CO2 Gadget configuration
- 6 Installation of CO2 Gadget Advanced
- 7 Pins used by CO2 Gadget (GPIO)
- 8 Technical support and help
- 9 Having problems? CO2 Gadget Frequently Asked Questions (FAQ)
CO2 Gadget is a firmware to create high quality CO2 monitors/meterswith optional sensors for temperature, humidity, atmospheric pressure and others that allow us to analyse the air quality we breathe.
You can install CO2 Gadget on virtually any ESP32-based CO2 meter you already have (99.99% of them) or build your own by following one of my step-by-step tutorials.
CO2 Gadget is a CO2 monitor (and much more) easy to build, easy to install and easy to use.
This monitor is as easy or even easier to assemble than CO2 Easy (the one from the old CO2 Meter tutorial on this long-running blog, which has been built by hundreds or thousands of users). CO2 Gadget is perfect for users who just want a meter, without complicating their life, even if they have never had any contact with electronic projects. and are not technically inclined.
CO2 Gadget highlights
Among the interesting functionalities implemented, you can find (among many others) the following ones advanced features:
- Real-time display in display, web page and serial port
- Management and configuration through a convenient on-screen menu or website
- Three modes of communication: WIFI, Bluetooth and ESP-NOW
- Captive portal. Direct WiFi connection to CO2 Gadget from your mobile phone without any configuration required.
- Many popular CO2 sensors are compatible: Sensirion SCD30, Sensirion SCD40 and SCD41, Senseair S8 LP, MH-Z19, Cubic CM1106
- Various sensors temperature, humidity and atmospheric pressure
- Temperature display in degrees Celsius or Fahrenheit
- Support for TFT LED colour displays
- Support for OLED displays
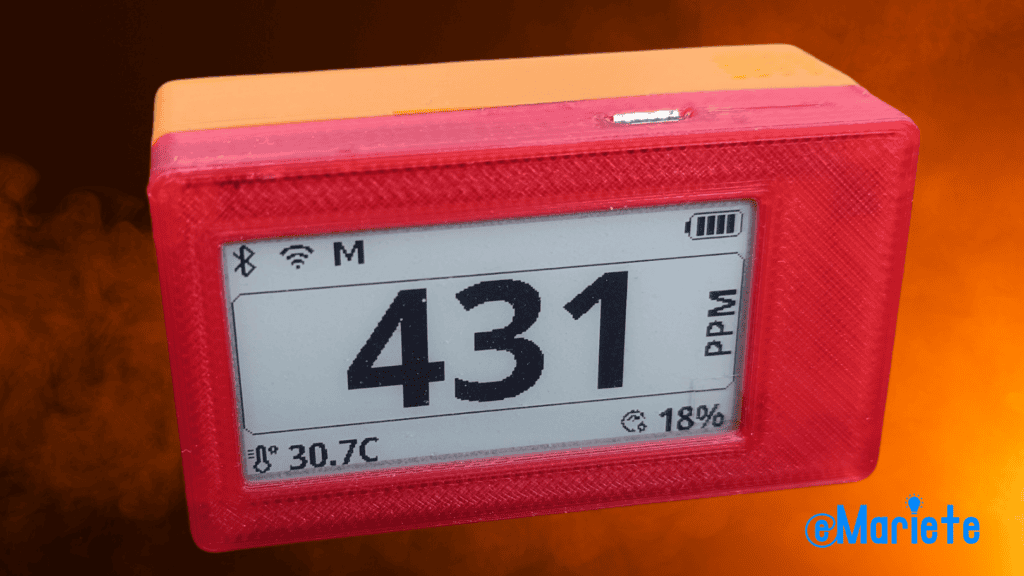
- Support for e-Ink, ePaper or Electronic Ink screens.
- Sending data by MQTT
- Reception of remote commands through MQTT
- Support for MQTT Discovery for Home Assistant (and others, such as OpenHub or HomeSeer with mcsMQTT)
- Compatible with the free Air Quality App Sensirion MyAmbience for iOS and Android with real-time visualisation, graphs and access to historical data
- Activation of relays for, for example, automate ventilation equipment
- Output for LEDs (or LED strips) RGB and Neopixel (WS2812B and others)
- Updates OTA through its website
- Local data logging with upload to Smart phonedata logger) with charging to the phone by BLE (Bluetooth Low Energy)
In addition to the above, a number of functionalities are being finalised, which will will be added shortly.
These new functionalities are:
- Low consumption. One to three months (or more) of battery life on a single charge.
- Support for ultra-low power sensors Senseair Sunrise and Sunlight.
- Support for particle sensors.
Who is CO2 Gadget aimed at?
Are you looking for a project exciting, practical y simple Do you want to surprise your family and friends with a gadget that they can only and proudly say: "I did it!"?
Then look no further! 🚀
The Gadget CO2 meter is intended for to everyoneincluding those who are looking for the WOW! effect, although if you force me to make a distinction, I will tell you that it is aimed at two types of public:
- Users who want a quality meter, uncomplicated and affordable
- Users with technical concerns who want to start from a good basis to adapt the operation of the CO2 meter. to your taste and needs.
If you are one of the first, here below you will find all the information you will need. If you are a technical user, you have everything you need in the repository at CO2 Gadget on GitHub (you know, technical users only!). CO2 Gadget is Open Source.
CO2 Gadget is an easy-to-use firmware, ready to install on an ESP32 board with just a few clicks.
As it is a Open Source, open source projectYou have at your disposal all its source code so that you can analyse it, modify it, learn from it or do whatever you want.
A nice thing you can do is to contribute your improvements to the CO2 Gadget code so that other users can benefit from them. Did you design a new display screen because you were not happy with the ones it came with? Share it!
This article is primarily intended for users of the CO2 Gadget firmware. For any issue related to your developmentIf you have any questions, problems or requests, please contact us at CO2 Gadget repository in project on GitHub.
What do I need to build CO2 Gadget?
Basically you need to three things: a board with the ESP32 chip, a CO2 sensor and the firmware. of this page.
You can use the CO2 Gadget Advanced firmware on almost any existing ESP32-based meter you already own. The 99% of existing ESP32-based meters are supported.
If you don't have a compatible CO2 meter, here are a couple of tutorials for you to build your own CO2 meter very easily.
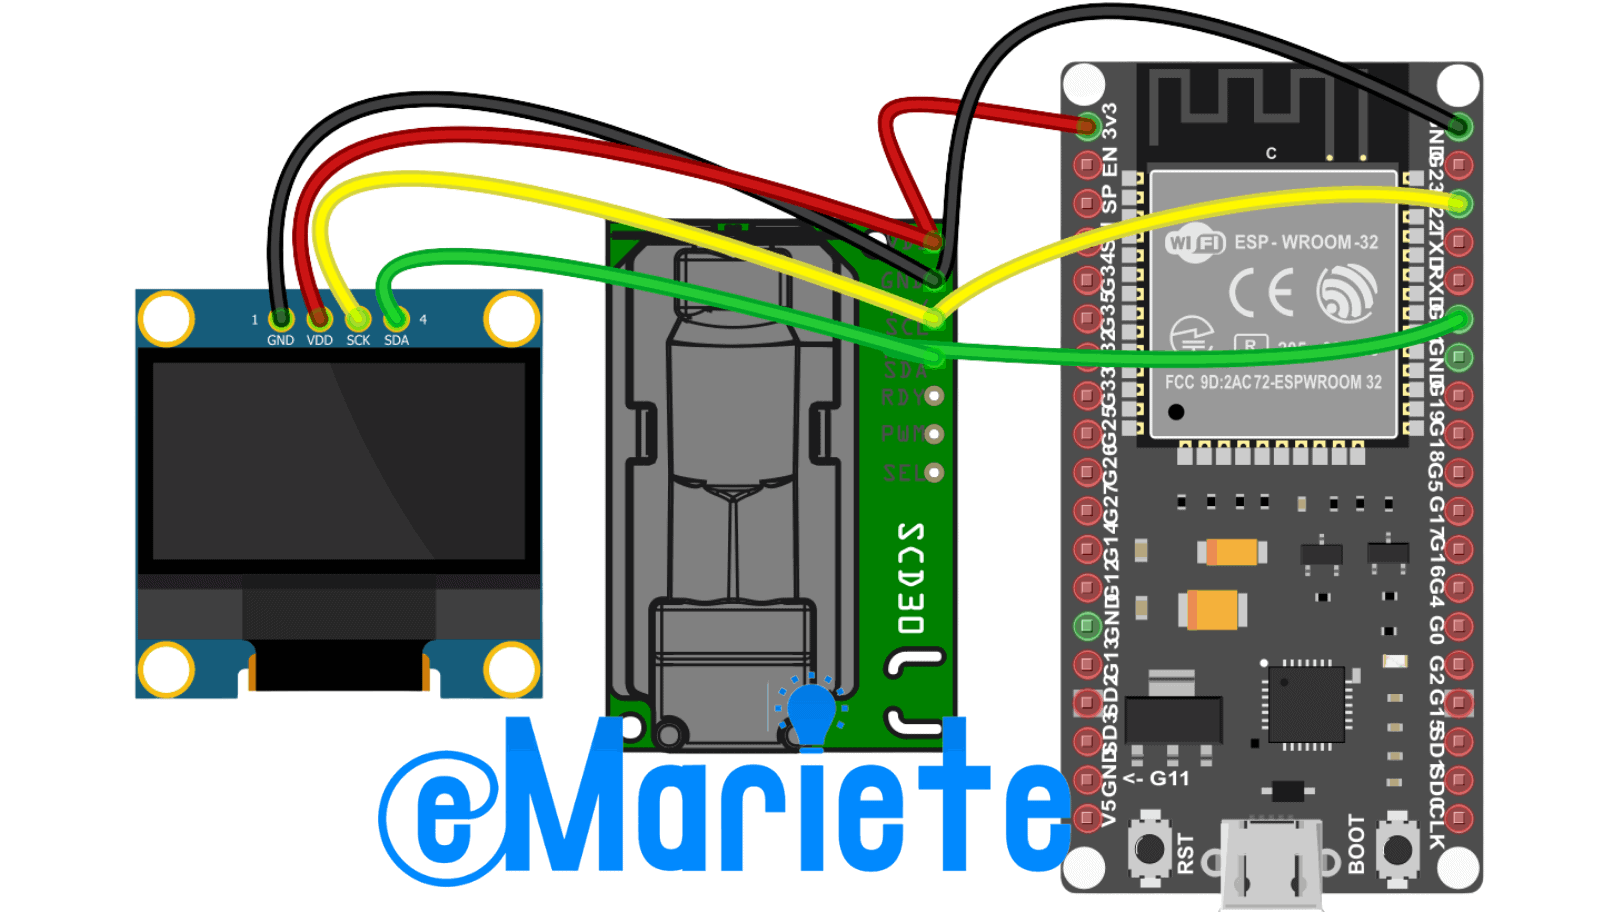
The first tutorial is made with a TTGO T-Display Board and a sensor Sensirion SCD30 Sensor but you can build your CO2 Gadget using many different sensors, boards and displays.as the I2C OLED display with 128*64 pixel SSH1106 driverwhich is fully supported, so that the choice is enormous.
This article is dedicated to the firmware, so I recommend you to follow one of the tutorials I have written and that you can find in this blog. For example:
These are two CO2 meters that you can build at less than an hour with only two components and four welds. I can safely say that they are the easiest to set up CO2 meters you'll ever find.
CO2 Gadget use
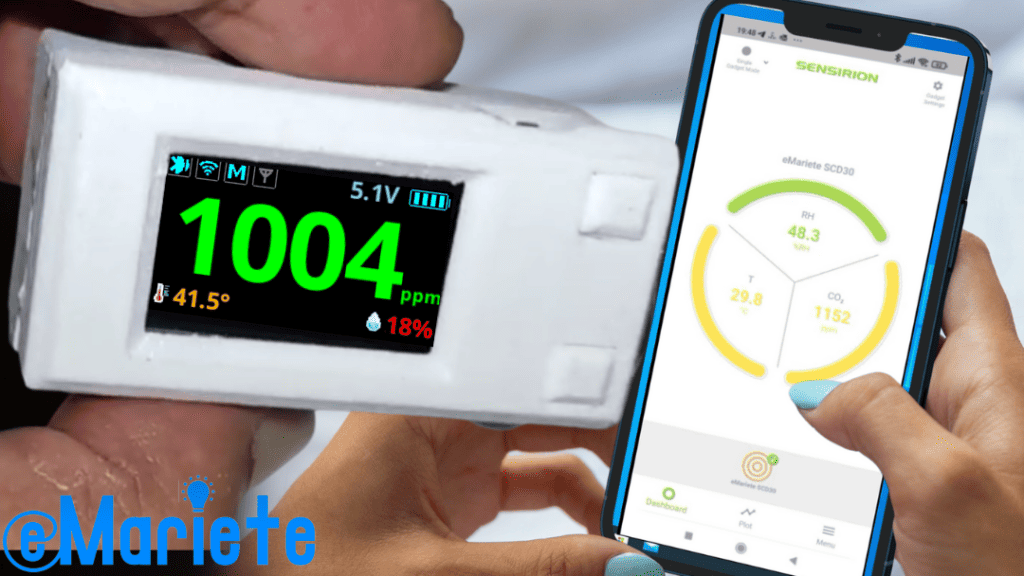
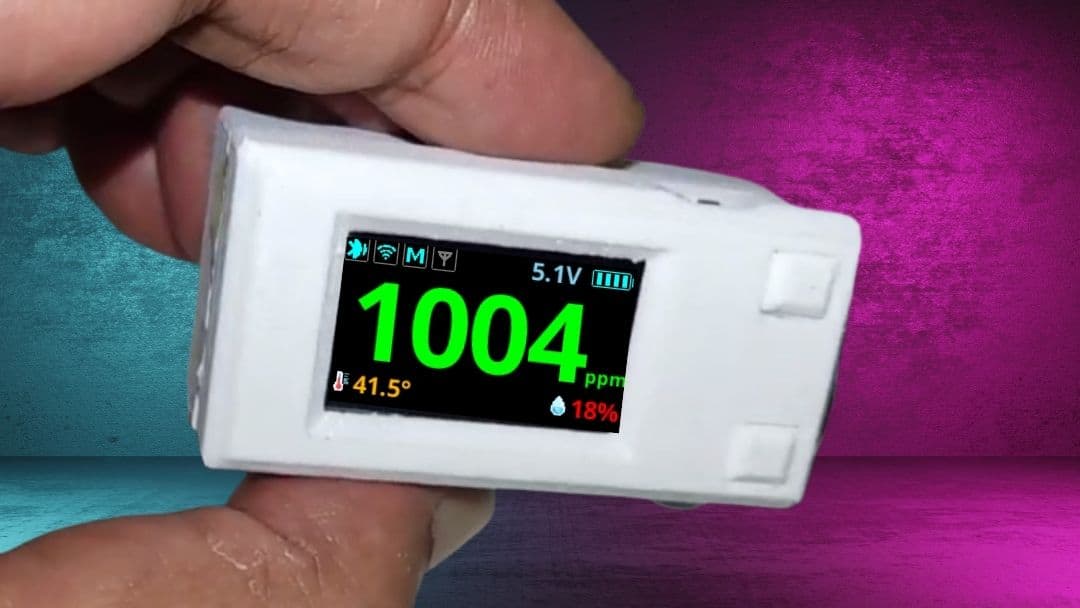
Using the meter couldn't be easier. Just switch it on, open the free Sensirion MyAmbience App on your mobile phone and view the values. It's as simple as that.
If you have mounted one of the versions with a display, you will be able to see the measurements on the screen as soon as you switch it on, without having to do anything else.
When you first turn on CO2 Gadget it will have a default configuration consisting of:
| OPTION | DEFAULT VALUE |
|---|---|
| BLE (Bluetooth Low Power) | ON |
| Wifi | OFF |
| MQTT | OFF |
| ESPNOW | OFF (Not enabled) |
| Colour green | Up to 700 ppm |
| Orange colour | Up to 1000 ppm |
| Red colour | From 1000 ppm |
This means that as soon as you turn the meter on for the first time, CO2 Gadget will be ready to display the data on your mobile or tablet without you having to do anything else.
All these values can be easily changed to suit your tastes, preferences or needs.
CO2 Gadget has many functionalities and options that you can use (if you want to) and I am going to tell you about each of them below.
Bluetooth operating mode
Bluetooth operation mode is always enabled, even if other options are also enabled.
In this mode, the meter sends its measurements via bluetooth to your mobile (Android or iOS) where an installed App allows you to view the values of these measurements in real time, consult historical data, and even calibrate the sensor or configure the CO2 Gadget's WiFi connection..

The App also allows you to export historical data, in case you want to use them in some way (load them into Excel, for example).
This is a very interesting option if what you want is to have a user-friendly CO2 meter without the need to send data to internet or integration with other systems.

Just install the Sensirion MyAmbience App from the official Google or Apple shops, depending on your device (is free of charge). Here are the links to both applications.


MWiFi operation modei
This mode allows you to access the meter via a web browser to view real-time measurements, configure it, view its status, etc.
When WiFi mode is active it is possible to access the web pages generated internally by CO2 Gadget.
Open your browser and go to http://ip_del_medidor. A web page will be displayed with the measurements taken by the meter in real time with graphs representing these measurements. This page will refresh every few seconds with the updated measurements without the need to reload the page.

For the integration of the meter with other systems you have three URLs (API end points) where you can access the measurements in text format:
Latest measure of CO2 concentration:
http://co2_gadget_ip/readCO2Current temperature value:
http://co2_gadget_ip/readTemperatureCurrent relative humidity value:
http://co2_gadget_ip/readHumidity You will need to replace "co2_gadget_ip" with the IP address of the monitor in your network. As you will see below, the easiest way to see this address is in the "Info" menu of the CO2 Gadget. For example:
http://192.168.1.201In order to avoid having to know the IP address and to be able to access by name, CO2 Gadget implements mDNS (also known as Multicast-DNS). This way you will be able to access the meter by typing in your Host in the address bar of your browser followed by the extension .localfor example:
http://CO2-Gadget.localYou can see the Host name on the WiFi configuration screen (and also via USB at boot time).
MESP-NOW mode of operation
ESP-NOW is a long-range, low-power radio communications protocol.
Its inclusion allows CO2 Gadget to send its data over several hundred metres without the need for additional hardware.
If you want to know more about this protocol, I recommend you to read my article on ESP-NOW and the ESP-NOW Gateway to MQTT
Note that ESP-Now is currently not enabled by default in the pre-built versions.
Activation of ventilation equipment (relay outputs)
CO2 Gadget has two outputs that can be used to activate relays or other elements, for example, automatically activate ventilation or air filtering equipmentactivate audible or luminous alarms, etc.
The concentrations at which these outputs are activated are customisable and match those you have configured as orange level and red level, being deactivated in green.
Both outputs turn on when the level of that colour is reached and do not turn off until the CO2 level drops at least 100 ppm below that level (hysteresis = 100ppm).
Hysteresis allows the connected device to avoid being switched on and off continuously if the concentration keeps fluctuating around that concentration).
RGB LED notifications
If you need to have a luminous indication of the CO2 concentration you can connect an RGB LED (or RGB strips) to the CO2 Gadget,
You can even use high-powered lighting using external relays - can you imagine large coloured spotlights in a discotheque indicating the CO2 level?
To connect an RGB LED, you will use the same relay outputs plus the green level output, which has a slightly different function:
The green LED can be permanently connected to positive through a resistor and will be on all the time.
Note that you will have to put three resistors, one for each colour, to limit the current supplied to each LED and prevent it from burning out (or damaging the board). I recommend you try values of about 330 or 470 ohms. The RGB LEDs to be used should be common cathode.
If you use RGB strips you will have to use external circuitry (relays may work) as they will probably consume more than the ESP32 can provide directly (about 60mA per output).
Neopixel LED Notifications (WS2812B)
CO2 Gadget supports notifications via WS2812B addressable coloured LEDs (also called Neopixel). Their operation in CO2 Gadget is very similar to normal RGB LEDs.
Keep in mind that these LEDs are designed to work with 5V, so if you power them with a battery you may have problems (I recommend you to put a "step up to raise the voltage to 5V). I've done some tests at 3.3V and they worked, but I can't guarantee they will in your case.
Buzzer alarms
You have the possibility to have audible alarms to warn you when CO2 levels are too high.
You can set these alarms to ring once, repeat every x seconds, and you can even choose the tone of the beep and its length.
You only need your meter to have a passive buzzer connected.
Communication of the CO2 meter by MQTT
The support of the MQTT protocol opens up a wide range of possibilities for sending the data generated by the meter to other systems, for example, home automation systemThe data can be stored in a database or visualised.
I use it with a Mosquitto broker and Nodered, which allows me to process them, store them in an InfluxDB database and visualise and analyse them easily in Grafana, getting graphs like these:

As you can imagine the MQTT functionality needs a WiFi connection to work.
Discovery MQTT for integration with Home Assistant
If you are a user of Home Assistant (a widespread open source home automation system) or other systems compatible with its Discovery by MQTT protocol, it will be very easy to integrate CO2 Gadget as the whole process is automatic.
Home Assistant will automatically discover your meter(s) and register them in the system:

Sending measurements by MQTT
CO2 Gadget sends CO2, temperature and humidity measurements every time there is an update on the following topics:
- topic/co2Sends the CO2 concentration in PPM with the value in the message payload.
- topic/tempSends the current temperature in degrees Celsius with the value in the message payload to two decimal places.
- topic/humiSend the relative humidity with the value in the message payload as a percentage.
Receiving commands via MQTT
In addition to sending data via MQTT, CO2 Gadget is also able to receive commands. Specifically, it can receive the following two commands, which can be very useful:
- topic/calibration ppm: By sending a message with the topic "topic/calibration" and a number between 400 and 2000 in the Payload (usually 400) we can instruct CO2 Gadget to calibrate the sensor to that concentration.
- topic/ambientpressure mbar: By sending a message with the topic "topic/ambientpressure" and the value of the atmospheric pressure in millibars, the CO2 sensor will be instructed to compensate the CO2 concentration by atmospheric pressure.
Alarm sending by MQTT
CO2 Gadget sends messages via MQTT corresponding to the colour levels (green, orange, and red) configured.
The messages sent are as follows:
- topic/green: Shipped with the text "ON" in the payload when the CO2 concentration is within the configured green range. OFF" will be sent in the payload when the concentration reaches the orange level.
- topic/orange: Shipped with the text "ON" in the payload when the CO2 concentration reaches or exceeds the configured orange range. OFF" shall be sent in the payload when the concentration drops below the orange level (no "OFF" is sent when switching to red).
- topic/network: Shipped with the text "ON" in the payload when the CO2 concentration reaches the red range. OFF" shall be sent in the payload when the concentration drops below the red range.
The orange and red messages have a hysteresis of 100 ppm so that the "OFF" message is not sent until the CO2 level drops at least 100 ppm below this level. It is planned that, in a future version, this hysteresis will be configurable in the menu.
CO2 Gadget configuration

The Gadget CO2 meter is very easy to configure via its on-screen menu, web page or serial port.
On-screen menu
Navigation through the on-screen menu is done by means of the two buttons on the front of the meter as follows:
- Short press on the top button = Up
- Short press on bottom button = Down
- Long press on top button = Enter/select
- Long press on bottom button = Back/unselect
You will see that, although it has only two buttons, the menu is very easy to use and you will soon have mastered it.
The use of buttons is optional. CO2 Gadget does not need buttons to work. You can configure all the options through the USB/serial port as you will see in the next point or through their website.
Serial port menu
If you have decided to set up a meter without a display or buttons, no problem. You can use the menu through the serial port, using any terminal program, by using the following keys on the numeric keypad of your computer:
- Key * = Enter/Select
- Key / = Back/Unselect
- Key - = Up
- + key = Down
In addition, you can directly use the numbers and letters on the keyboard to enter data.

The menu is exactly the same on the screen and on the serial port. What you see on one you will see on the other, and simultaneously.
Note that the following characters are reserved for menu operation: "/", "*", "+" and "-"). If you need to enter them somewhere (such as the SSID or Wifi password) you will not be able to do this via the serial port and will have to use the buttons.
Configuration web page
In addition to being able to configure CO2 Gadget via its display and serial port, it is also possible to configure it via its internal website.
All you have to do is log in:
http://co2_gadget_ip/preferences.html
This functionality will be especially useful when the meter does not have a display or when it is not accessible. It may also be more convenient for editing certain parameters.
All options are self-explanatory and by placing the mouse pointer over the icon ℹ️ you can see an explanation of their usefulness and use.
Note that, for security reasons, the password fields are disabled by default. The reason is that the password travels in plain text over the network and could be captured by a sniffer or other technique. If you want to enable password editing you will need to add the parameter relaxedSecurity=true to the url.
http://ip_del_medidor/preferences.html?relaxedSecurity=trueMain menu

From the main menu you can enter the menus of: Information, Calibration and Configuration. With the last option, Exit, you can leave the menu and return to the main screen with the measured data.
Information
In this menu you have useful information about the meter.
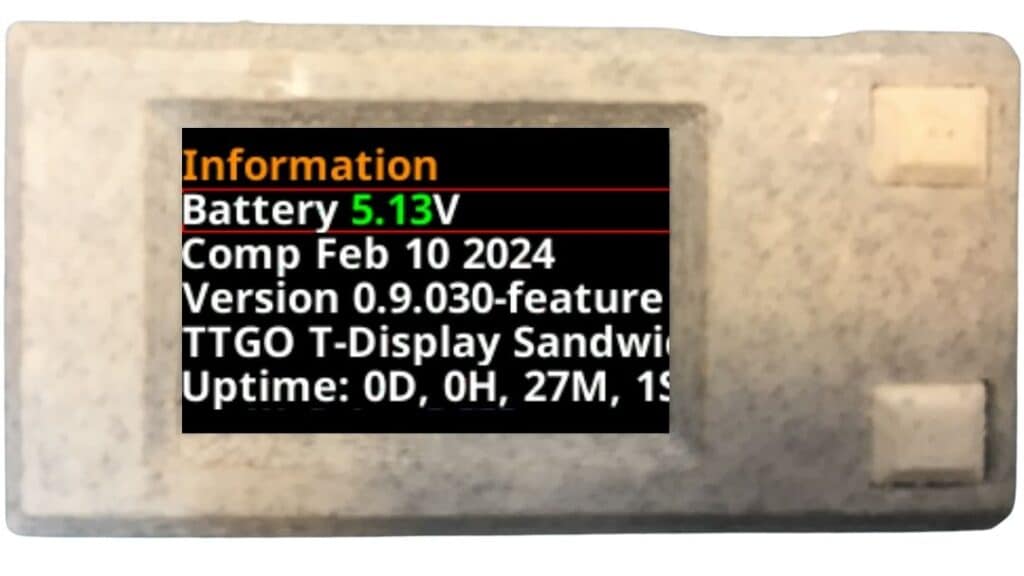
- Comp: The compilation date of the CO2 Gadget in MMM DD YYYYYY format.
- Version: The version number of the CO2 Gadget charger firmware in the meter.
- IP: The IP address of the meter, if it is connected to a WiFi network. Disconnected" will be displayed if the network is disconnected and "Disabled" will be displayed if WiFi is disabled.
- DLE Dev: The Bluetooth device code. It will be useful, if you have several meters, to differentiate one from another in the App.
- Back: Back to previous menu
Calibration
Here you can activate and deactivate the automatic calibration of the CO2 sensor, as well as perform a manual calibration.

- Auto Cal: Allows you to turn the automatic calibration of the CO2 sensor ON/OFF.
- Calibrate at 400ppm: By selecting this option with a long press you can calibrate the sensor at 400ppm.
- Custom Cal: Allows you to specify a concentration between 400 and 2000 ppm at which you want to calibrate.
- Calibrate at custom: Perform calibration at the concentration specified in "Custom Cal".
- Back: Back to previous menu
The option "Calibrate at custom ppm"is intended for advanced users. Its main use is to be able to calibrate the CO2 sensor using another reference CO2 sensor. Not all sensors have this possibility.
Configuration
In this menu, with several options and submenus, you can configure different CO2 Gadget options.


The following options and submenus are available:
- CO2 Sensor: Options related to CO2 measurement such as activation and deactivation of automatic calibration, the colours you want to use for the concentration ranges, humidity or atmospheric pressure compensation, etc.
- BLE Config: Activating and deactivating BLE (Bluetooth Low Energy) and its settings
- WIFI Config: Activating and deactivating WiFi and its settings
- MQTT Config: Activating and deactivating MQTT and its settings
- Battery Config: Battery Configuration
- Temp Config: Configuration of temperature-related parameters (temperature offset and units of measurement).
- Display Config: Display configuration options
- Neopixel config: Neopixel type LED configuration (WS2812B)
- Outputs config: Configuration of relay and RGB LED outputs
- Save preferences: Save preferences to the NVR (non-volatile memory) so that they are permanent, even if you remove power from the meter.
- Back: Back to previous menu
CO2 Sensor
In this menu you can configure everything related to the CO2 sensor installed in CO2 Gadget.

- Sensor: Here you can select the installed sensor from: Auto (for I2C sensors such as Sensirion SCD30, SCD40 and SCD41), MH-Z19, CM1106 and Senseair S8.
- Auto Cal: ON/OFF: Enables or disables automatic sensor calibration.
- Pres. Comp: Sets the pressure in millibars for pressure-dependent CO2 concentration compensation.
- Altitude: Set the height above sea level to perform pressure compensation (if you do not know the atmospheric pressure).
- Orange: CO2 concentration level in PPM above which you want the display to appear orange.
- Red: CO2 level in PPM for the colour red.
- Debug sensors: ON/OFF: Enables the output of additional sensor information via the serial (USB) port to assist in debugging the sensors.
CO2 sensor selection
To select the sensor, simply press "Enter" on the "Sensor" option (e.g. a long press on the top button of a TTGO T-Display) to access a submenu where you can choose the sensor you have connected to the CO2 Gadget.

Scroll through the available sensors (up and down buttons or "/" and "+" on the serial terminal) until you select the one you want to choose and press "Enter" to select it (if you are using the serial console, in this case please do not select it by menu number).
Remember that sensors with I2C connection (Sensirion SCD30, SCD40 and SCD41) are automatically detected. Just choose "Auto" and CO2 Gadget will detect and use it automatically.
Don't forget to save the configuration when you are done and satisfied.
BLE Config
BLE (Bluetooth Low Energy) is the radio communication technology that CO2 Gadget uses to communicate with your mobile phone or tablet.

If you want to display the CO2 Gadget data in the MyAmbience App you need this option to be turned ON.
WIFI Config
In this menu you can activate and deactivate the WiFi and configure its parameters, such as the SSID and password.

- WiFi Enable: ON/OFF: With this option you can activate and deactivate WiFi. Interesting if you are not going to use it, for example, away from home, to increase battery life.
- SSID: You must enter the SSID, the "name", of the access point you want CO2 Gadget to connect to.
- Pass: You must enter the password of your WiFi network. For privacy reasons, it is not displayed on screen.
- Host: The host name, or hostnameCO2 Gadget on the web
* From the web configuration you can configure a fixed IP address for CO2 Gadget, if needed.
MQTT Config
Here you can configure everything to do with CO2 Gadget MQTT communication.
The following options are available:

- MQTT Enable: Enables (ON) or disables (OFF) the MQTT communication functionalities of the meter.
- Topic: Topic where CO2 Gadget will send and receive messages.
- Id: The Client Id or Client Identifier that CO2 Gadget will use when connecting to the broker. This identifier must be unique (there must not be more than one device with the same identifier).
- Broker IP: This is the IP address of the MQTT broker (server) to which CO2 Gadget must connect.
- User: User name to be used for authentication with the MQTT broker.
- Pass: The authentication key with the MQTT broker.
- Back: Back to previous menu
ESP-NOW Config
This menu allows you to set the options available for using the ESP-NOW radio communications protocol in CO2 Gadget.

- ESP-NOW Enable [ON/OFF]: Enables or disables the ESP-Now protocol.
- TX Time: Allows you to set the interval between sends using ESP-Now between 10 and 360 seconds.
- Board ID: So that you can have multiple meters connected by ESP-Now simultaneously, you can assign a number to each of them.
- Peer MAC: The MAC address you will use to send data over ESP-Now.
Battery Config
In this menu you can configure different aspects related to the battery.

These parameters are a bit technical and you can ignore them completely if you want. They serve to match the voltage displayed on the screen to the actual battery voltage.
- Battery: Current voltage of the battery (or external power supply if connected).
- Voltage ref: Value of the internal voltage reference.
- Bat Full (mV): Value in millivolts that matches the voltage of the battery when fully charged.
- Bat Empty (mV): Minimum value in millivolts when we assume that the battery is completely discharged (the moment when the meter shuts down due to lack of voltage or starts to give erroneous measurements due to too low a voltage).
- Back: Back to previous menu
If you don't have a voltmeter, you can do the following calibration, which is very simple and will give you a battery voltage very close to the real one: Connect the meter to a good power supply or USB charger with a good cable (I recommend you use a branded one, like Samsung, Xiaomi, etc) and adjust the "Voltage ref" value so that the voltage read from the battery reads approximately 5.00 volts (on the boards I have tested it on, the Voltage ref value is around 930-960mV).
Temp Config
Configuration of temperature-related parameters.

- Temp: Current temperature (always in degrees Celsius)
- Offset: Temperature offset (always in degrees Celsius) to adjust for possible discrepancies in temperature measurement. It must be a number positive that shall be subtracted the measured temperature.
- Units [Celsius/Fahrenheit]: Allows you to select the units of measurement for the display (only the display on the display, the rest is always in degrees Celsius).
Display Config
Here you have options related to the CO2 Gadget display and how it is managed.


- Brightness: Brightness of the display from 0 (off) to 255 (maximum brightness).
- Time To Off: Time in seconds without pressing a button for the screen to turn off automatically. Useful for battery saving. The display will be switched on again by briefly pressing the top button. Setting it to 0 disables it (screen always on).
- Off on USB: Allows you to select whether you want the screen to turn off when CO2 Gadget is running on external power (USB, for example). In this case it may not be necessary to turn it off to save battery power, but you may want to turn it off to avoid being disturbed by the light if you have it on your bedside table.
- Orient: [Normal/Reversed]: Allows you to rotate the display 180°. This way on, for example, a TTGO T-Display board, the USB port and buttons would be on the left. The functions of the buttons are also reversed so that the operation remains normal (when rotated 180º the one on top will be on the bottom and vice versa).
- Temp: [Show/Hide]: Shows or hides the temperature measurement on the display. Useful when the meter does not have a temperature sensor (or its measurements are not valid).
- Humidity: [Show/Hide]: Shows or hides the humidity measurement on the display. Useful when the meter does not have a humidity sensor (or its measurements are not valid).
- Battery: [Show/Hide]: Allows you to choose whether to show or hide the battery data. Useful when the meter has no battery.
Outputs Config

- Buzzer Config: Buzzer configuration for audible alarms.
- Neopix Bright: Allows you to choose the brightness of the Neopixel LEDs (WS2812B).
- Neopixels: Selection of the type of Neopixel used. The available options are NEO_GRB, NEO_RGB and NEO_RGBW (all at 800Khz).
- GPIO Outputs: You can select whether to connect RGB LEDs or relays to the outputs to adjust their operating mode.
Buzzer Config
These options allow you to set the audible alarms to your liking.

- Buzzer: You can choose between "OFF" which will cause the buzzer to be disabled and the audible alarms to be turned off, "One time" which will cause the buzzer to beep only once when the red value is reached, and "Every x" which will cause the alarm to repeat at an interval of your choice (you can select between 5 seconds and 5 minutes).
- Tone: Allows you to choose the tone of the buzzer you like best.
- Span: Allows you to select the length of each beep, according to your preference.
The buzzer is disabled while you are inside the menu to avoid annoying beeps while making your changes.
Installation of CO2 Gadget Advanced
Installing CO2 Gadget on the board with the ESP32 is super easy. You don't have to download or install anything on your PC..
Just click the button corresponding to the version you want to install, select the port where your board is connected and click "Connect". It's as simple as that, the recording of the ESP32 on the board will be done in no time with just a few clicks..
It couldn't be easier! In this video you can see that installing and connecting to your WiFi network is child's play. No need to compile or install anything on your PC!
| Taste | Version | Date | Install |
|---|---|---|---|
| TTGO_TDISPLAY_SANDWICH | v0.014.006 | 09-06-2024 | |
| TTGO_TDISPLAY | v0.014.006 | 09-06-2024 | |
| TDISPLAY_S3 | v0.014.006 | 09-06-2024 | |
| esp32dev_OLED | v0.014.006 | 09-06-2024 | |
| esp32dev | v0.014.006 | 09-06-2024 | |
| esp32dev_ST7789_240x320 | v0.014.006 | 09-06-2024 | |
| ttgo-t5-EINKBOARDGDEM0213B74 | v0.014.006 | 09-06-2024 | |
| ttgo-t5-EINKBOARDDEPG0213BN | v0.014.006 | 09-06-2024 | |
| ttgo-t5-EINKBOARDGDEW0213M21 | v0.014.006 | 09-06-2024 | |
| ttgo-t7-EINKBOARDGDEM029T94 | v0.014.006 | 09-06-2024 | |
| ttgo-t7-WEACT_GDEH0154D67 | v0.014.006 | 09-06-2024 | |
| ttgo-t7-WEACT_DEPG0213BN | v0.014.006 | 09-06-2024 | |
| ttgo-t7-WEACT_GxEPD2_290_BS | v0.014.006 | 09-06-2024 |
Choose the flavour you want to install and follow the instructions.
- TTGO_TDISPLAY_SANDWICH: TTGO T-Display board with I2C sensor on alternate pins (SDA on 21 and SCD on 22)
- TTGO_TDISPLAY: TTGO T-Display board with I2C sensor on normal pins (SDA on 21 and SCD on 22)
- TDISPLAY_S3: T-Display S3 board with I2C sensor on normal pins (SDA on 42 and SCD on 43). Available soon.
- esp32dev_OLED: Generic ESP32 board with OLED display (SH1106 128X64)
- esp32dev: Generic ESP32 board without display
- esp32dev_ST7789_240×320: Generic board with 240×320 TFT display and ST7789 controller
- ttgo-t5-EINKBOARDGDEM0213B74: Lilygo TTGO T5 with e-Ink display with panel GDEM0213B74
- ttgo-t5-EINKBOARDDEPG0213BN: Lilygo TTGO T5 with e-Ink display with DEPG0213BN panel
- ttgo-t5-EINKBOARDGDEW0213M21: Lilygo TTGO T5 with e-Ink display with panel GDEW0213M21
- ttgo-t7-EINKBOARDGDEM029T94: Generic ESP32 board with e-Ink display GDEM029T94
- ttgo-t7-WEACT_GDEH0154D67: Generic ESP32 board with WeAct Studio e-Ink display GDEH0154D67
- ttgo-t7-WEACT_DEPG0213BN: Generic ESP32 board with WeAct Studio e-Ink display DEPG0213BN
- ttgo-t7-WEACT_GxEPD2_290_BS: Generic ESP32 board with WeAct Studio e-Ink display GDEM029T94 BS
Optional, clear the memory:
When uploading the firmware you have the option to select "Erase device", which will first erase the ESP32 memory and reset all settings. Recommended when installing CO2 Gadget for the first time.

Firmware download (binaries)
The above method is the easiest way to upload the firmware to your ESP32. If you prefer to upload it in a different way, here you have the ➡ links to CO2 Gadget binaries so that you can download them.
CO2 Gadget Beta-Development Version
This is a test version Beta-Development of CO2 Gadget which is not intended for general use. I recommend you use the "normal" ones unless I have told you in the Telegram group, in the comments or on GitHub, to use this one for some reason (usually to test something specific).
| Taste | Version | Date | Install |
|---|---|---|---|
| TTGO_TDISPLAY_SANDWICH | 0.16.013-beta | 21-06-2026 | |
| TTGO_TDISPLAY | 0.16.013-beta | 21-06-2026 | |
| TDISPLAY_S3 | 0.16.013-beta | 21-06-2026 | |
| esp32dev_OLED | 0.16.013-beta | 21-06-2026 | |
| esp32dev | 0.16.013-beta | 21-06-2026 | |
| esp32dev_ST7789_240x320 | 0.16.013-beta | 21-06-2026 | |
| ttgo-t5-EINKBOARDGDEM0213B74 | 0.16.013-beta | 21-06-2026 | |
| ttgo-t5-EINKBOARDDEPG0213BN | 0.16.013-beta | 21-06-2026 | |
| ttgo-t5-EINKBOARDGDEW0213M21 | 0.16.013-beta | 21-06-2026 | |
| ttgo-t7-EINKBOARDGDEM029T94 | 0.16.013-beta | 21-06-2026 | |
| ttgo-t7-WEACT_GDEH0154D67 | 0.16.013-beta | 21-06-2026 | |
| ttgo-t7-WEACT_DEPG0213BN | 0.16.013-beta | 21-06-2026 | |
| ttgo-t7-WEACT_GxEPD2_290_BS | 0.16.013-beta | 21-06-2026 |
Known issues with this beta (no need to report them):
- Data collection in myAmbiance does not work properly when downloading the readings stored in CO2 Gadget (it works fine when you are viewing them in real time). Sensirion has already confirmed that this is a bug in myAmbiance and will be fixed in the next release. Issue on GitHub.
- The T-Display S3 board does not turn off the screen. Issue on GitHub.
- The new e-Ink displays GDEW0213M21and DEPG0213BN on Lilygo TTGO T5 boards seem to work well. Issue on GitHub.
- The e-Ink displays GDEM0213B74 and GDEH0154D67 still give some problems with partial screen refresh. Issue on GitHub.
- The e-Ink display GxEPD2_290_BS is included, but has not yet been tested. Issue on GitHub.
Pins used by CO2 Gadget (GPIO)
Although in the build tutorials of the blog you will find detailed pins to use, here you have, in a more generic way, the pins used by each CO2 Gadget firmware variant.
| Variant | Display | RX/TX | I2C SDA/SCL | UP/DWN | GPIO Orange | GPIO Red | GPIO Battery | GPIO Buzzer | GPIO Neopixel |
|---|---|---|---|---|---|---|---|---|---|
| esp32dev | N/A | 17/16 | 21/22 | 15/0 | 32 | 33 | 34 | 2 | 26 |
| esp32dev_OLED | SSH1106 128×64 | 17/16 | 21/22 | 15/0 | 32 | 33 | 34 | 2 | 26 |
| TTGO_TDISPLAY | TFT 240×135 | 13/12 | 21/22 | 35/0 | 32 | 33 | 34 | 2 | 26 |
| TTGO_TDISPLAY_SANDWICH | TFT 240×135 | 13/12 | 22/21 | 35/0 | 32 | 33 | 34 | 2 | 26 |
| TDISPLAY_S3 | TFT 320×170 | 18/17 | 43/44 | 14/0 | 3 | 1 | 4 | 2 | 16 |
| ttgo-t5-EINKBOARDDEPG0213BN | E-Ink 2.13″ DEPG0213BN | 15/14 | 21/22 | -1/-1 | 32 | 33 | 35 | 2 | 26 |
| ttgo-t5-EINKBOARDGDEW0213M21 | E-Ink 2.13″ GDEW0213M21 | 15/14 | 21/22 | -1/-1 | 32 | 33 | 35 | 2 | 26 |
| ttgo-t7-EINKBOARDGDEM029T94 | E-Ink 2.9″ GDEM029T94 | 15/14 | 21/22 | -1/-1 | 32 | 33 | 35 | 2 | 26 |
| esp32dev-ST7789_240x320 | ST7789_240x320 | 17/16 | 21/22 | 19/0 | 32 | 33 | 34 | 2 | 26 |
- Variant: Firmware variant name, depending on your meter hardware.
- Display: Display supported by the variant.
- RX/TX: Pins (GPIO) used for the connection of sensors connected by serial port
- I2C: Pins (GPIO) corresponding to the I2C bus for connection of I2C sensors and I2C displays
- UP/DWN: Pins (GPIO) to which the "Up" and "Down" buttons are connected. These are optional, CO2 Gadget is fully functional without buttons connected.
- GPIO Orange: Pin (GPIO) corresponding to the output when the orange level is reached.
- GPIO Red: Pin (GPIO) corresponding to the output when the orange level is reached.
- GPIO BatteryPin for battery reading. Note that on most boards the maximum admissible value is 1V or 3.3V, so you will have to put a resistive divider at the input.
- GPIO NeopixelPin to which you must connect the data line of the Neopixel or WS2812B LEDs.
For boards not listed here or if you need more information, I recommend you to consult directly the platformio.ini file of the version you are using. For example, CO2-Gadget/platformio.ini at master - melkati/CO2-Gadget (github.com). You can also consult the eMariete Telegram group.
Technical support and help
If you encounter any difficulties join the Telegram group or write your question, problem or request in the section CO2 Gadget Issues on GitHub (recommended for questions in English).
Having problems? CO2 Gadget Frequently Asked Questions (FAQ)
Although the project is very straightforward, there is always the possibility that you may have a question or a problem.
In the list below, you will find answers to the most common questions and doubts.
Many of the changes applied via the website require a restart of the meter.
On the configuration page itself you have a button that allows you to reboot (remember to save your changes first).
For security reasons, password fields are disabled by default. This is because passwords are transmitted in plain text over the network, which could allow them to be captured by a sniffer or other techniques.
The recommended and most secure method of setting the passcode is via the on-screen menu, the USB menu, or via Bluetooth using the MyAmbiance application.
If you want to enable password editing, you will need to add the relaxedSecurity=true parameter to the URL:
http://ip_del_medidor/preferences.html?relaxedSecurity=true
CO2 Gadget is fully supported by Home Assistant - you don't have to do a thing!
Thanks to MQTT Discovery, Home Assistant will detect CO2 Gadget automatically and you will see it in Home Assistant without having to do anything.
Of course!
As soon as you configure CO2 Gadget to connect to your MQTT broker, Home Assistant will discover the CO2 meter automatically and you will see it in Home Assistant without you having to do anything.
The configuration through the website has limited error checking, so it is very important that you are very careful with the data you enter.
If the changes prevent CO2 Gadget from starting or configuring correctly, you may need to erase the flash memory.
If you need to reset the CO2 Gadget configuration, you will need to erase its flash memory.
The easiest way to do this is via the web recorder, by selecting the "Erase device" option:
This may be because your Windows installation does not have the necessary drivers to communicate with it.
Normally Windows 10 should download it from the internet automatically, but there may be cases where this is not the case.
Depending on the communications chip on your ESP32 board, you will need one or the other.
Choose the option that corresponds to your ESP32 board and your computer's operating system.
Drivers for CP2102 on Windows
Windows 10 - Windows 10 - Windows 10 should download automatically
Windows 7/8/8.1
Drivers for CH341 on Windows
Windows - Windows 10 should download it automatically
Drivers for MacOS
MacOS - NodeMCU with CP2102 chip
MacOS - NodeMCU with CH341 chip
Linux Drivers
You do not need to install the drivers. You can check this with dmesg
Drivers for ch9102x under Windows
Some NodeMCU boards (few, so far) have the ch9102x chip. Here you can download the ch9102x driver for Windows (page in Chinese, I have not found it in English) select the first link):
It seems that for the ch9102x to work properly it is preferable not to exceed 115200 bps.
This is BEFORE The problem with CO2 Gadget loading is usually related to a hardware error (something wrongly connected, power supply problems, USB cable, etc.).
Although CO2 Gadget supports other sensors, and all supported sensors are of good quality, I recommend one of these sensors:
Sensirion SCD30 Sensor (recommended)
Senseair S8 LP (recommended)
This is usually due to a problem with the power supply or wiring.
Make sure you are using a good quality charger. Any mobile phone charger that has an output of more than 500mA should be used. real (I recommend 1 Ampere), will do.
If you have problems with operation or if you get wrong readings, try a charger that says 1000 or 2000 mA. Often the data given by the charger is far from its real capacity.
I recommend that you use a quality power supply or charger. The vast majority of problems are due to power supply problems.
Also be careful with the cables. You can't imagine how many cables there are that give problems because of their poor quality.
If you have problems with USB power, try another USB cable. We have seen many cases here of poor quality USB cables giving problems and replacing the cable with a better one solved all the problems.
With the sandwich version you should have no problems with the connection between the board and the sensor, but if you are making the version with the sensor attached to the board by cables, make sure that the cables are as short as possible and not extremely thin.
If you are powering the sensor with a battery connected directly to the battery terminal on the TTGO T-Display board (not a battery or powerbank connected to the USB port) and you are getting erroneous readings or resets it could be for one of these reasons:
1. You are using a bad (or very low capacity) battery.
The sensor needs a stable 3.3V to function correctly. A battery in poor condition (old, worn or misused) may not be able to provide the required current without dropping in voltage, which could cause the sensor to receive less than 3.3V.
Voltage drops can also occur if too small a battery is used. For example, a 300mAh battery (to say a capacity as it depends on the particular battery) may not be able to maintain the voltage when the meter is consuming 300mA.
2. The battery voltage is below the minimum voltage that the meter needs to operate.
The meter needs to operate through its internal battery connector at a voltage of at least 3.5-3.6V (a little more or less depending on the tolerance of the components on your particular board). Below a certain battery voltage, no 3.3V will come out of the 3V pin and the sensor will give erroneous measurements or behave strangely.
This minimum voltage of 3.5-3.6V is also responsible for the meter not "squeezing" the maximum power from the battery and reducing its autonomy. You can improve this point by using an external step up to power the sensor at 5V (or step down to power the sensor at 3.3V) or a low voltage drop voltage regulator, such as the MCP1700-3.3V, to power the sensor independently directly from the battery without going through the T-Display board. I will expand on this in the tutorial as soon as I have time.
Under normal conditions the sensor measurements are quite stable and there should not be large jumps in the reported concentration unless there is a real sharp difference in the air.
If you find that the CO2 concentration measurements are too unstable (e.g. in an interior room with little movement), it is usually due to one of the following reasons:
1. CO2 sensor power supply problems: CO2 sensors need a very stable voltage to work well. If the voltage is not stable due to, for example, poor quality chargers/feeders and/or cables. Check the previous point "The meter seems to go "crazy" sometimes".
2. Air currents: The CO2 sensors we use are very sensitive to direct air currents (some more, some less) so it is important that they are protected and not directly exposed to air. Ideally, they should be placed in a suitable box.
Even if you are going to calibrate outdoors and there is some wind, you may see instability in the measurements. In this case you can even put the meter in a transparent plastic bag, not completely airtight, and press the calibration button through it. If it is already in its box you should have no problem.
CO2 sensors in a box do not need a lot of air intake to work perfectly. A small opening is enough (even the small slots left in the box for buttons, pushbuttons, display, etc.).
To find out if you are suffering from problem 1 or problem 2 I suggest that you put the meter in a box (transparent if necessary) and observe its measurements. If the measurements stabilise it is probably a problem with the air currents, if the measurements do not stabilise it is probably a problem with the power supply.
The power supply to the CO2 sensor is extremely important to obtain good readings.
Not only must the voltage be within the manufacturer's specifications, but it must also be stable. A CO2 sensor should not be powered directly from the battery, because as the voltage drops as the battery discharges, the measurements will change.
Furthermore, you must calibrate the CO2 sensor with the voltage that will be used later. If you calibrate the CO2 sensor with one voltage and later use the sensor with a different voltage, the measurements will be wrong.
The solution for using 5V CO2 sensors with battery power is to use a step up or "booster module". More on this here: Adding battery charger to ESP8266 and ESP32 (well done).
Note: The tutorial with the TTGO T-Display board and SCD30 CO2 sensor feeds the sensor at 3.3V (within the manufacturer's specifications) via an on-board regulator, so you don't have this problem. You have to pay attention if you replace it with another sensor.
Be aware that the temperature and humidity sensors are affected by the heat generated by the electronics of the meter (especially in very compact enclosures, where the temperature inside the enclosure can get quite high).
If you want accurate measurements, you will have no choice but to isolate these sensors from the rest of the meter's electronics.
You can make the displayed temperature closer to the real temperature by adjusting the "Offset" in the "Temp Config" menu. For example, I have set an Offset of 13.5ºC on the compact meter with TTGO T-Display board because it generates quite a lot of heat (relatively).
The SCD30, SCD40 and SCD41 sensors also automatically adjust the humidity deviations based on the temperature setting (offset) so that the measurements obtained are also quite close to reality.
Relative humidity is temperature dependent.
For the SCD30, SCD40 and SCD41 sensors, which adjust the relative humidity calculation based on temperature, if the temperature reading is not correct, the humidity will not be correct either.
Try to correct the temperature by applying an offset as indicated. here.
If you are using a Sensirion SCD30, SCD40 or SCD41 sensor, the temperature offset is processed by the sensor's own firmware (the program loaded into the sensor by the manufacturer).
The firmware of these sensors is implemented in such a way that the temperature offset is applied over time, so you will not see it applied all at once, but over several minutes.
Simply set the offset you need and wait several minutes and you will see it gradually take effect.
The battery voltage displayed on the screen is merely a guideline. The circuitry does not allow a very accurate battery reading and I do not think it is worth the trouble to improve this point.
If you want to have a more accurate voltage indication you can adjust the voltage reference in the "Battery config" menu.
When the battery charge is too low, the charger kicks in to recharge the battery. This additional charge can cause a drop in battery voltage. The magnitude of this voltage drop varies depending on the specific hardware you are using. It takes some time for the voltage to recover and rise above a certain threshold (currently around 4.45V) that CO2 Gadget uses to determine if it is running on external power.
As a result, it may take some time for the battery icon to reflect the switch to external power.
It is important to note that a similar voltage drop can occur when the CO2 sensor performs a measurement. For example, with an SCD30 sensor, the current can increase from around 70mA to over 270mA during a measurement, which can potentially cause the voltage to drop below the 4.45V threshold, leading CO2 Gadget to erroneously assume that it is operating on battery power.
This fluctuation may cause the battery icon to alternate between battery and external power modes.
Similarly, if the display is set to be on when connected to external power and off when on battery, the voltage drop when switching to battery mode may cause the display to turn off. This lower power consumption may cause the voltage to rise again, resulting in an on/off/on/off cycle, with the battery icon reflecting this behaviour.
It is worth noting that these problems can occur depending on the hardware used. While we cannot control the hardware on the board, the use of quality cables, a reliable power adapter and a good quality battery can help mitigate these problems.
Play around with the buttons and familiarise yourself with their behaviour. Test to get the feel of what is a long press and what is a short press.
Experiment with how text data (such as SSID and WiFi password) is entered.
At first it may seem a bit erratic and confusing but you will soon get used to it. You will see that the system is not difficult at all and allows us to do everything with just two buttons (otherwise we would have to put additional buttons).
The sensor is a delicate measuring instrument. You should take the following precautions when mounting it:
– Weld it fast, don't dawdle. The sensor is very sensitive to extreme heat.
- The sensor is sensitive to static electricity. Avoid touching the pins and components with your fingers as much as possible.
- Before touching the sensor, touch something with your hand, which is grounded, to discharge static electricity (e.g. a water or heating pipe).
- The sensor housing is not just a box, it is an active part of the sensor. Be careful not to put any force on it.
Normally everything will work the first time if you follow the tutorial step by step.
If you find yourself in the situation where you have already recorded the meter's firmware and don't know what it is doing, you can find out what is going on through the serial (USB) port on the board.
When you turn on CO2 Gadget and it starts to boot, it starts to pull information about its boot and what it is doing through the USB port.
You can view this information by installing a serial terminal program (Arduino IDE, Putty or other) to the USB port on your computer or simply by selecting the "LOGS & CONSOLE" option in the web firmware upload tool.
CO2 Gadget supports the following CO2 sensors:
Sensirion SCD30 Sensor (recommended)
Senseair S8 LP (recommended)
Sensirion SCD40
Sensirion SCD41
MH-Z19
Cubic CM1106
If you are going to use a 5V powered CO2 sensor it is very important that you read the point "How important is the power supply to the CO2 sensor?"
Yes. CO2 Gadget supports, and has been tested with, the following sensors connected via serial port:
- Senseair S8 LP
- MH-Z19 (A/B/C/D)
- Cubic CM1106 (and possibly the CM1107 although I have no reports from people who have tried it).
The pins to connect the sensor depend on the board you are using.
At the moment, there is support for generic ESP32 boards (almost any board) and the TTGO T-Display specifically.
CO2 Gadget supports many different boards and displays.
You can use a normal ESP32 development board, e.g. the ESP32 DevKitC-32D boardand how to display using, for example, a I2C OLED display with 128*64 pixel SSH1106 driver
Ask the Telegram group if you need help.
Yes, you can measure the voltage by connecting the battery positive to a pin on your board. In the table Pins used by CO2 Gadget you have the one used by default on your board.
Note that on most boards the maximum allowable value on this pin is 3.3V, while a fully charged li-ion battery can give 4.2V, so you will need to put a resistive divider on the input like this one, which divides the input voltage by 2:
You can use any 3.7v nominal Li-ion or Li-Po battery. It will depend mainly on the dimensions of the case.
The TTGO T-Display board uses a TP4056 charger chip without additional protections (overcharge only), so the battery must have, at a minimum, short-circuit, over-discharge, and over-current protection.
If the battery does not have internal protections, it would be advisable to install a protection plate like this or similar.
You can use a 128×64 pixel OLED SSH1106 display.
The OLED display has a high display qualityeven outdoors, with a fairly low power consumption (around 20mA).
Its connection could not be simpler. It is connected via I2C bus, just like the SCD30 or SCD4x sensor, just connect it in parallel with the sensor. as shown in the diagram below. 
You can use the two CO2 Gadget outputs to connect relays or contactors to activate and deactivate extractors, fans, air cleaners, etc. when CO2 levels reach certain levels.
The concentrations at which these outputs are activated are customisable and match those you have configured in the options menu "...".CO2 Sensor"as orange and red colours.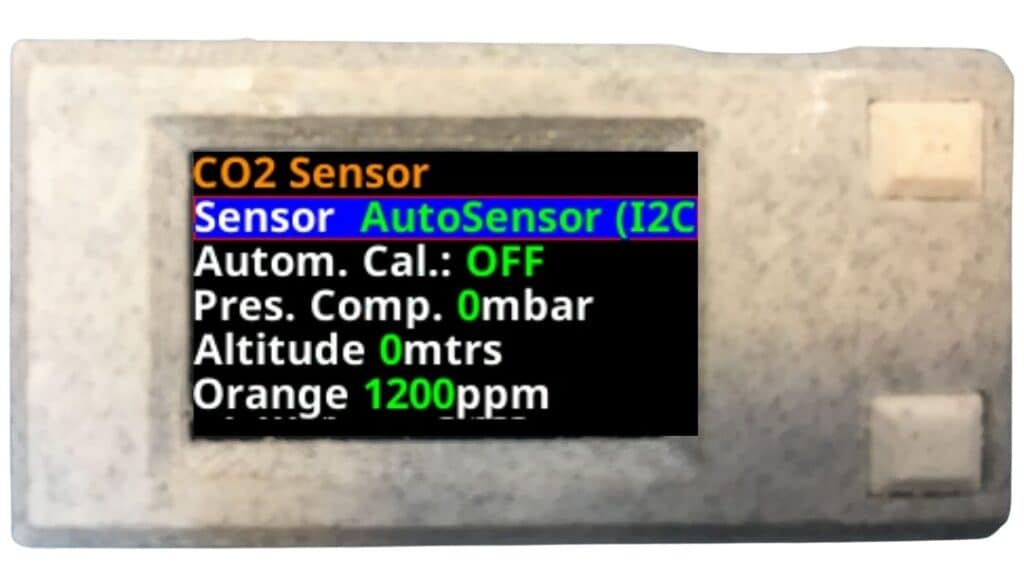
In this example, when CO2 reaches 700 ppm, CO2 Gadget will activate the orange output and when it reaches 1000 ppm it will activate the red output (the orange output will also remain active).
The red output will be deactivated when the concentration drops below 900 ppm (1000 ppm minus 100 hysteresis) and the orange output will be deactivated when the concentration drops below 600 ppm (700 ppm minus 100 hysteresis).
The 100 ppm hysteresis prevents the outputs from being switched on and off continuously if the concentration keeps fluctuating around the corresponding concentration.
mDNS (Multicast-DNS) support is not available on all computers, it depends on your operating system and its version. If you are using Windows and your version does not support mDNS, the quickest and easiest way to get it supported is to install the Apple Bonjour Print Services for Windows.
CO2 Gadget is constantly being improved and expanded and many new features are being added.
You have available a CO2 Gadget Roadmap where you can see what is planned and what stage of development it is at.
You can ask for the inclusion of a new CO2 Gadget functionality here. If there is something you don't find in CO2 Gadget and you would like it to be implemented, go ahead and ask for it. All requests are studied with great interest.
Not only can it be as accurate as a commercially available meter, but it can also is likely to be more accurate than a commercial meter.
For example, the SCD30 sensor, used in CO2 Gadget, is a better quality sensor than those used in the vast majority of commercial meters under €500 that you can find on the market.
The result will depend on how well you mount it and calibrate it correctly.
Read the article Are home CO₂ meters as reliable, accurate and precise as commercial ones? if you want to know more.
If you encounter any difficulties and need help or have any queries, you have two options:
1. Join the eMariete Telegram group . A group where we talk about cacharreo, where several users, and myself, will be able to help you. This group is mainly in Spanish.
2. Write your question, problem or request in the section CO2 Gadget Issues on GitHub (recommended for questions in English).
This article is intended for users of the CO2 Gadget firmware. For any issue related to your developmentIf you have any questions, problems or requests, please contact us at CO2 Gadget repository in project on GitHub.
For any issue related to developmentIf you have any questions, problems or requests, please contact us at CO2 Gadget repository in project on GitHub.
This article is intended for users of the CO2 Gadget firmware.
Share this article
Thank you very much for collaborating with the most difficult part of this project: SHARING IT AND MAKING IT KNOWN. It is useless how hard I can work on these tutorials and projects if people don't get to know about them. THANK YOU TO EVERYONE WHO SHARES! Just below you have buttons that make it easy to share it on Facebook, Twitter, WhatsApp and Telegram.
This post is intended for users of the CO2 Gadget firmware. For any issue related to your developmentIf you have any questions, problems or requests, please contact us at CO2 Gadget project repository on GitHub.
Great, as always, when I get home I'll install it and see how it goes.
👌
Hi,
Very impressed by your gadget. I am using MH-z19 CO2 sensor and not sensirion. How could I activate it?
Thanks
Hi Frédéric.
Flash the Beta-Development version (https://emariete.com/en/meter-co2-gadget/#Version_sandwich_Beta-Desarrollo)
Connect MH-Z19 pin RX to 12 and TX - 13
Select in CO2 Gadget's menu "Configuration->CO2 Sensor" MH-Z19
Your test will be very welcome as this functionality for serial connected sensors is tested with Senseair S8 and Cubic CM1106 but we miss a test with MH-Z19.
This beta is temporary for testing, as support for serial connected sensors is in testing, and this will be included in the normal version in the next few days...
Please, if you find any issue with this beta report at: https://github.com/melkati/CO2-Gadget/issues
Hi Mariete,
I am using the T-Display board, one of my buttons is broken. I am using the Serial Monitor to enter information. In the WiFI menu, how do I clear data so I can enter my home SSID/PW?
SSID: You must enter the SSID, the "name", of the access point you want the CO2 Gadget to connect to.
I don't see a method to clear the previous entry.
Thanks for the wonderful Tutorial and your software!
Hi Joe.
You don't need to clear the previous data. Simply type your SSID/PW overwriting the old value. If the old value was longer than the new data you can simply overwrite the rest with spaces (CO2 Gadget will clean the leading spaces on save).
Thanks so much, that worked!
Dear Mariete:
In the "CO2 Gadget Highlights" section, the name of the free air quality application "Sensirion MyAmbiance" was spelled incorrectly.
It should read "Sensirion MyAmbience".
https://apps.apple.com/mx/app/sensirion-myambience/id1529131572
Thank you for sharing this very useful and necessary project to prevent the spread of #CoViDIsAirborne.
Hello JeanMichel.
Thank you very much for the warning. It has been corrected.
Best regards.
Hi,
First of all thank you for the nice work and effort you put into this project!
I can confirm that it works with the CO2 Sensor" MH-Z19. (esp32dev_OLED) I'm using you're latest version 5.0.41.
I have some questions about the Neopixel led, I can't get it to work on pin26. The individual (green P25, yellow P32, red P33) leds are not a problem.
Also the 2 push buttons on pin 35/34, I can't get to work. Pin 34 is also used for the battery?
(tried with pin0 but also nothing). Controlling the menu with serial commands for the moment. Can you please tell me what I can try next?
One final question, if I understand correctly only co2 sensors are supported for the moment? Because on your github page there are some pm and environmental sensors supported. If needed I'm willing to try some.
Hi Bart.
The support for Neopixel is not in the latest release yet, it's still in a private beta (I was just documenting it yesterday). Will be released over the weekend.
Let me fix the buttons issue, please. I hope it will be fixed today.
Support for PM 2.5 is coming. I'm waiting for a fix in a third-party library. I guess it will be ready soon.
Best regards.
Hi Bart.
While I have time to do some tests and include it in the next release, I just left for you a "Beta-development version" version with:
- Support for Neopixel
- Buttons on pins 35 and 0
Please, test and report if it's working fine so I can include on regular release.
Look above for the "Beta-Development Version (https://emariete.com/en/meter-co2-gadget/#Version_Beta-Desarrollo)
Hi Mariete,
Thank you again, also for the very fast response.
I tried the Neopixel part. It's working but I have the wrong type of pixels because the colours are wrong 🙂 Green is red and vice versa.
I cannot conform button p36 because my esp32-wroom version doesn't have a pin 36.
I'm also testing the TTGO_TDISPLAY version with Sensirion SCD30.
If you need more testing I can help you with that but I'm not a guru like you.
Hi Bart.
I had no time to test the Neopixel LED myself. Maybe, it's a bug. I'll try to test it as soon as possible with some original WS2812B (hope today, tomorrow at most).
Please, try again the updated version with buttons on pins 35 and 0. I realized it makes no sense to have buttons on different pins than those of TTGO T-Display for the "generic ESP32 flavor".
Please, check (on display or serial terminal) that the loaded version shows, at least, "v0.5.047-feature-neopixel" as there are situations where server or browser cache can serve an outdated version.
Any testing with new versions is very welcome as I have no time to test each version with different hardwares.
Thank you for your kind words. No, I'm not a guru! 😀
actually there are a lot of flavors of ws2812b led chips/strips, so controllers usually have settings to switch rgb/gbr/brg and other combinations...
Thanks, Jakub.
The only addressable LED introduced right now in this precompiled beta is the original WS2812B. In future versions there will be more addressable LED supported but, before introducing the needed code to select and including it in the menu, I prefer to have some feedback with the original WS2812B, as it's the most widely used and the only one I have.
Internally CO2 Gadget supports many different addressable LEDs (all the Adafruit library supports). So, you can compile your own version supporting any other with just one line change in code.
Right now, the issue Bart is having can be a bug where I drive the wrong colour, as I didn't have the time to test it myself.
Here I'm back with an update. I hope that you like the feedback.
It's tested with the latest beta version v0.5.047 as stated in the menu.
I tried the buttons, button P0 is working perfect but P35 doesn't.
I will try another esp32 to rule this out.
As jakub said my Neopixel "problem" will probably be the flavour rgb/gbr/brg.
Is it possible there is a bug in the menu for the display?
menu (4) configuration - (7) Display Config - (2) Time to off.
If I change this other then 0.
I get error unfunctional, TO DO Main turning off display to save power.
I also tested the TTGO T- normal version with the Sensirion SCD30.
I like the colour tft. Can I ask what offset you use for the temperatur?
Tested the app (not in detail yet), wifi all looks fine.
The MQTT part is next. I try to test as much as possible for you.
I have esp-easy firmware with a Sensair S8 next to it but the value of the co2 is roughly 100ppm different than the SCD30.
Going to put a MH-Z19 with CO2 Gadget side by side to compare all three.
Hi Bart.
Thank you very much. This feedback help me a lot to improve CO2 Gadget and fix things.
I will build a rig with OLED to test the buttons and some other things (I don't have one built right now for testing). Have you checked (on display or serial terminal) that the loaded version shows "v0.5.047-feature-neopixel"?
I plan to add over the weekend the LED configuration to the menu so it's possible to select RGB, GBR, NEO_RGBW, etc (there is a place where you can see the "status": https://github.com/melkati/CO2-Gadget/issues/72)
The issue regarding the "(4) configuration - (7) Display Config - (2) Time to off" problem is because the OLED support, right now, is very limited. Here you can see whats pending to do: https://github.com/melkati/CO2-Gadget/issues/51
The temperature offset depends a lot on enclosure, TFT brightness, etc. with the compact enclosure in a sandwich configuration I have an offset of 13ºC.
My S8 and SCD30, when in the range 400 to 1000ppm, usually are within 50 ppm one of another:
If you check on LOGS & CONSOLE
and then click on RESET DEVICE you can see the first log messages where the version information is:
Hi Bart.
There is a new "Beta-Development Version" (https://emariete.com/en/meter-co2-gadget/#Version_Beta-Desarrollo) that adds a configuration menu ("Neopixel Config"under "Configuration") to choose one of the supported Neopixel types (I'll add more in the future) and brightness.
Please, after updating make sure it show, at least, "CO2 Gadget Version: 0.5.049-feature-neopixel Flavour: ESP32 OLED".
Hope it fixes issues with your Neopixel flavor. Please, give me feedback when you have the time to test.
Hi Bart.
The issue with button UP connected to GPIO35 should be fixed now with the new release v0.5.069.
The issue was, probably, that you didn't have a pull up resistor connected to the UP button. It's fixed now by changing button UP to GPIO15 without needing any resistor. I had to change GPIO as it has a internal pull up (old GPIO35 doesn't have internal pull up).
Please, if you find any problems, open an issue at CO2 Gadget GitHub repository by pressing green button "New issue".
hello,
thanks for great work man.
I made my printed box bigger to fit 18650 cell inside.
When I try to download history using sensirion app, download state is stuck at 0%, have anyone experienced that?
Great! 😀 😀 Great!
Will you be sharing the box design? I'm preparing a post with some different enclosures so each user can choose the best for him depending on sensor, display used, battery, design preferences, etc. There are already a few of them users sent me, some on Tinkercad.com, so other users can modify to their needs, some others on Thingiverse.com.
Regarding the download from the App, may be it's a bug introduced in one of the last versions. Could you open an issue for this at GitHub, please?: https://github.com/melkati/CO2-Gadget/issues
case with holes for mh-z19 sensor is here https://www.prusaprinters.org/cs/prints/115651-simple-co2-meter-and-logger-ttgomh-z19
Great, nice case! Thank you! 😊
I'll prepare a post on the blog over the next few days with all the available cases for CO2 Gadget and will include these. 👍
now I realized that I am using mh-z19b which needs 4,5-5,5V and using the battery it gets only 3,6-4,2V depending on state of charge. I tried powering it using powebank, I measured 4,7V on pins, and values were the same (tested at 500 and 1500ppm level) as from the 4V battery. Do you think it is crucial? I read your article about mh-z19c, which is more picky about the voltage.
Hi Jakub.
The CO2 sensor's power supply is extremely important to have good readings.
Not only the voltage must be within the specs indicated by the manufacturer but also, the voltage must be stable. You should not power a CO2 sensor directly from the battery because as the voltage drops as the battery discharges the measurements will change.
Actually, you must calibrate the CO2 sensor at the voltage it will be used later. If you calibrate the CO2 sensor at one voltage and later, you use the sensor with a different voltage the measurements will be wrong.
The solution to use 5V CO2 sensors on battery is to use a "step up module. More on this here: Adding battery charger to ESP8266 and ESP32 (well done)
I hope this information is useful to you.
I see, thank you, I will use step up, I have some laying around
Hi Jakub.
Issues with downloading of historical data to MyAmbience App should be fixed now with the new version v0.6.000
I download the sources, for use with Arduino Ide, and I get a lot of broken includes errors.
Impossible to compile and upload.
Hello Chema.
No files are missing, everything is in the CO2 Gadget repository on GitHub..
As explained in the instructions and in the code comments, the code is currently not ready to compile with the Arduino IDE and the instructions are not up to date. If you want to compile with the Arduino IDE, you will have to resolve includes, dependencies and defines yourself.
When the code is more stable and has less changes I will adapt the code and write the instructions to compile with Arduino IDE (right now it is modified very often with bugfixes and new features and it takes me a lot of time to be aware of maintaining compatibility with Arduino IDE).
I recommend you to use VS Code with PlatformIO. There are many tutorials on the internet and it is not as difficult as it seems.
Hey Mariete,
I like your Project really much.
I want to go on with it on my own, but I am not able to upload the code in arduino IDE, because there is a file missing:
#include
Can you tell me, where I can get the file and where to put it? I am trying the last version from GIT.
I am planning to build more of the devices and to send the data to a database from where I want to go on...
Hi Tim.
There are not files missing, everything is at CO2 Gadget's GitHub repository.
As explained in the instructions and in the code comments, currently neither the code is ready to compile with the Arduino IDE nor the instructions are up to date. If you want to compile with the Arduino IDE, you will have to solve includes, dependencies and defines yourself.
When the code is more stable and has fewer changes, I will adapt the code and write the instructions to compile with the Arduino IDE (right now it is modified very often with bugfixes and new functionalities and it takes me a lot of time to be aware of maintaining compatibility with the Arduino IDE).
I recommend that you use VS Code with PlatformIO. On the internet you have many tutorials, and it is not as difficult at all as it seems.
Hi,
I have tested the Version: 0.5.049-feature-neopixel Flavour: ESP32 OLED (empty> flash)
The Bright settings work.
I can clearly see the setting changing the led from red to green and vice versa but saving the settings and reboot puts the led back to red when it should be green. After checking the settings again after the reboot they are correctly saved. (I have the rgb version). If I toggle them again, it gets the correct colour again.
I also have the rgb leds connected. I see 700 orange, state in between orange and green. >1000 I have orange and red. But only red I don't have.
If you want pictures or something, just let me know where to send them.
The Bright settings work.
Hi Bart.
Thank you for your feedback. It's unbelievably valuable to me.
So, looks like it's not applying the saved configuration at startup. I'll fix this in the next version.
Regarding the RGB LED not turning off the orange when turning on the red, it is normal, as these outputs double as relay outputs. If you look in the FAQ at the point "...".Can CO2 Gadget turn ventilation equipment on and off?" the orange output is not turned off when red goes on (to keep ventilation or air cleaning equipment working when CO2 rises). To fix it when working with LED I'll include a new option in menu to select if these outputs should work in "relay mode" (keeping orange on when red goes on) or "LED mode" (turning orange off when red goes on).
Hi Bart.
There is a new CO2 Gadget version released (v0.5.069) that should fix both problems.
Please, if you find any problem open an issue at GitHub so it can be fixed: https://github.com/melkati/CO2-Gadget/issues
Best regards and thank you for your feedback.
Hey Mariete, nice project and got the waffled version running. I had some issues though on flashing from a MacBook where I moved to Windows laptop it was swifltly flashed. The LiPo battery as well: learned that batteries are not all the same size ...
Question: to try to extend battery life: can you share the BLE message format? That way I could just read the BLE message into my home automation.
Regards, Wim
Hi Wim.
CO2 Gadget uses Sensirion's Arduino BLE Gadget Library.
Everything is published at CO2 Gadget's GitHub repository. Go ahead and look at the source code.
Hi Mariete,
It seems that there is a limit for the length of the wifi password (around 28 caracters). My password is rather long with 37 car and I can't have a wifi connection. Do you confirm this limit. How to overpass it ?
Anyway, you have done a wonderful job !!!!
laurent
Hi.
Thank you for reporting this.
Yes, the actual max password length is around 30 characters.
I will increase the length as to the maximum password length standard that allows a max length of 63 characters.
I hope to have this fix ready very soon. See for updates: https://github.com/melkati/CO2-Gadget/issues/86
Best regards.
Hi,
Is it possible to integrate this CO2 project into Home assistant ?
I know that it is possible to use SCD30 with ESPHome, but it is not possible to manually calibrate the sensor with ESP Home, whereas it is possible with your project.
Regards
Hi Romain.
Yes, it's possible.
The best option is to integrate it via MQTT as its supported by both, Home Assistant and CO2 Gadget, and it's really powerful and simple to setup and use.
I used step-up so voltage is stable 5V, but now I don't know when battery is going to die, TTGO is showing 5V all the time. We could use some analog in pin to show real battery voltage, or maybe, use step up only for powering the CO2 sensor and feed TTGO battery voltage?
Hi Jakub.
Yes, it's better to use the step up only for powering the CO2 sensor (saves energy that way also).
Hi,
I don't understant, I can enable Wifi on my ESP32 with the OLED version firmware. I have this error :
[WiFi-event] event: 5 - Disconnected from WiFi access point
I enter my Wifi SSID and the correct password.
Do you have any ideas ?
Thanks
Hi Romain.
Don't know what the issue can be here, nobody reported this before. Better open an issue at GitHub as this will need more investigation...
SCD41 running just fine. On the Comm output, I see this:
->[SENS] CO2: 1459 CO2humi: 29.81 CO2temp: 32.04 H: 0.00 T: 0.00
->[SENS] CO2: 1458 CO2humi: 29.97 CO2temp: 32.08 H: 0.00 T: 0.00
What is H: 0.00 T: 0.00? I don't know what to look up since I don't know what it could be.
Hi Mike.
CO2 Gadget supports external temperature and humidity sensors (apart from the integrated sensors in the, in you case, SCD41). H: 0.00 T: 0.00 shows data from these external sensors. In your case it's zero because you don't have any connected.
I know you use the external library for sensor support but have you seen this...
Sensirion SEN5x Environmental Sensor Node : https://www.mouser.co.uk/new/sensirion/sensirion-sen5x/ PM, NOx, VOC, RH, and T all-in-one package.
It would be awesome to see it working with this project!!!
Hi jr.
It's a nice sensor.
Support for PM sensors in CO2 Gadget is planned. I can't include it now as I don't have one of these sensors. If anyone wants to donate a sensor (or make a pull request to include support for it) I'll be more than happy to include it.
Very nice project, hats off to you!
Got a couple of questions:
1. The questions in the FAQ on this page cannot be expanded. Nothing happens when I click them. I tried in Edge and Firefox, both normal and inprivate mode. Is it broken?
2. Where can I find how to connect a MH-Z19 and a BME280 sensor?
Hello,
This is an amazing project !
Sorry If I missed this information, but I was looking for the wiring diagram.
My plan is to use a MH-Z19C with a TTGO T-display, a BME280 and a WS2812B LED, would this be possible?
Thanks !
Configuration web page
In addition to being able to configure CO2 Gadget via its display and serial port, it is possible to change the options via its website.
Hi,
I would like to open the configuration webpage, where can I find it?
Hi Peter.
You can access it at:
http://device_ip/preferences.html
or
http://device_name.local/preferences.html
Best regards.