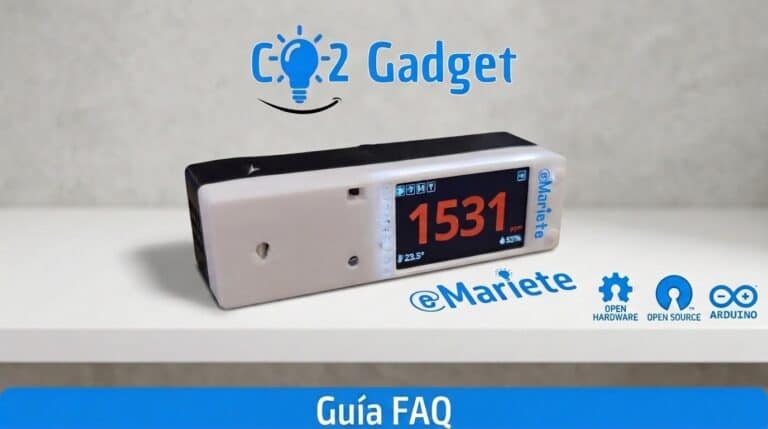
Here are the answers to the most frequently asked questions about the project CO₂ Gadget: what it is, how to build it, which sensors to use, how to set it up, how to integrate it with Home Assistant, how to troubleshoot common issues, and much more.
Many of the changes applied via the website require a restart of the meter.
On the configuration page itself you have a button that allows you to reboot (remember to save your changes first).
For security reasons, password fields are disabled by default. This is because passwords are transmitted in plain text over the network, which could allow them to be captured by a sniffer or other techniques.
The recommended and most secure method of setting the passcode is via the on-screen menu, the USB menu, or via Bluetooth using the MyAmbiance application.
If you want to enable password editing, you will need to add the relaxedSecurity=true parameter to the URL:
http://ip_del_medidor/preferences.html?relaxedSecurity=true
CO2 Gadget is fully supported by Home Assistant - you don't have to do a thing!
Thanks to MQTT Discovery, Home Assistant will detect CO2 Gadget automatically and you will see it in Home Assistant without having to do anything.
Of course!
As soon as you configure CO2 Gadget to connect to your MQTT broker, Home Assistant will discover the CO2 meter automatically and you will see it in Home Assistant without you having to do anything.
The configuration through the website has limited error checking, so it is very important that you are very careful with the data you enter.
If the changes prevent CO2 Gadget from starting or configuring correctly, you may need to erase the flash memory.
If you need to reset the CO2 Gadget configuration, you will need to erase its flash memory.
The easiest way to do this is via the web recorder, by selecting the "Erase device" option:
This may be because your Windows installation does not have the necessary drivers to communicate with it.
Normally Windows 10 should download it from the internet automatically, but there may be cases where this is not the case.
Depending on the communications chip on your ESP32 board, you will need one or the other.
Choose the option that corresponds to your ESP32 board and your computer's operating system.
Drivers for CP2102 on Windows
Windows 10 - Windows 10 - Windows 10 should download automatically
Windows 7/8/8.1
Drivers for CH341 on Windows
Windows - Windows 10 should download it automatically
Drivers for MacOS
MacOS - NodeMCU with CP2102 chip
MacOS - NodeMCU with CH341 chip
Linux Drivers
You do not need to install the drivers. You can check this with dmesg
Drivers for ch9102x under Windows
Some NodeMCU boards (few, so far) have the ch9102x chip. Here you can download the ch9102x driver for Windows (page in Chinese, I have not found it in English) select the first link):
It seems that for the ch9102x to work properly it is preferable not to exceed 115200 bps.
This is BEFORE The problem with CO2 Gadget loading is usually related to a hardware error (something wrongly connected, power supply problems, USB cable, etc.).
Although CO2 Gadget supports other sensors, and all supported sensors are of good quality, I recommend one of these sensors:
Sensirion SCD30 Sensor (recommended)
Senseair S8 LP (recommended)
This is usually due to a problem with the power supply or wiring.
Make sure you are using a good quality charger. Any mobile phone charger that has an output of more than 500mA should be used. real (I recommend 1 Ampere), will do.
If you have problems with operation or if you get wrong readings, try a charger that says 1000 or 2000 mA. Often the data given by the charger is far from its real capacity.
I recommend that you use a quality power supply or charger. The vast majority of problems are due to power supply problems.
Also be careful with the cables. You can't imagine how many cables there are that give problems because of their poor quality.
If you have problems with USB power, try another USB cable. We have seen many cases here of poor quality USB cables giving problems and replacing the cable with a better one solved all the problems.
With the sandwich version you should have no problems with the connection between the board and the sensor, but if you are making the version with the sensor attached to the board by cables, make sure that the cables are as short as possible and not extremely thin.
If you are powering the sensor with a battery connected directly to the battery terminal on the TTGO T-Display board (not a battery or powerbank connected to the USB port) and you are getting erroneous readings or resets it could be for one of these reasons:
1. You are using a bad (or very low capacity) battery.
The sensor needs a stable 3.3V to function correctly. A battery in poor condition (old, worn or misused) may not be able to provide the required current without dropping in voltage, which could cause the sensor to receive less than 3.3V.
Voltage drops can also occur if too small a battery is used. For example, a 300mAh battery (to say a capacity as it depends on the particular battery) may not be able to maintain the voltage when the meter is consuming 300mA.
2. The battery voltage is below the minimum voltage that the meter needs to operate.
The meter needs to operate through its internal battery connector at a voltage of at least 3.5-3.6V (a little more or less depending on the tolerance of the components on your particular board). Below a certain battery voltage, no 3.3V will come out of the 3V pin and the sensor will give erroneous measurements or behave strangely.
This minimum voltage of 3.5-3.6V is also responsible for the meter not "squeezing" the maximum power from the battery and reducing its autonomy. You can improve this point by using an external step up to power the sensor at 5V (or step down to power the sensor at 3.3V) or a low voltage drop voltage regulator, such as the MCP1700-3.3V, to power the sensor independently directly from the battery without going through the T-Display board. I will expand on this in the tutorial as soon as I have time.
Under normal conditions the sensor measurements are quite stable and there should not be large jumps in the reported concentration unless there is a real sharp difference in the air.
If you find that the CO2 concentration measurements are too unstable (e.g. in an interior room with little movement), it is usually due to one of the following reasons:
1. CO2 sensor power supply problems: CO2 sensors need a very stable voltage to work well. If the voltage is not stable due to, for example, poor quality chargers/feeders and/or cables. Check the previous point "The meter seems to go "crazy" sometimes".
2. Air currents: The CO2 sensors we use are very sensitive to direct air currents (some more, some less) so it is important that they are protected and not directly exposed to air. Ideally, they should be placed in a suitable box.
Even if you are going to calibrate outdoors and there is some wind, you may see instability in the measurements. In this case you can even put the meter in a transparent plastic bag, not completely airtight, and press the calibration button through it. If it is already in its box you should have no problem.
CO2 sensors in a box do not need a lot of air intake to work perfectly. A small opening is enough (even the small slots left in the box for buttons, pushbuttons, display, etc.).
To find out if you are suffering from problem 1 or problem 2 I suggest that you put the meter in a box (transparent if necessary) and observe its measurements. If the measurements stabilise it is probably a problem with the air currents, if the measurements do not stabilise it is probably a problem with the power supply.
The power supply to the CO2 sensor is extremely important to obtain good readings.
Not only must the voltage be within the manufacturer's specifications, but it must also be stable. A CO2 sensor should not be powered directly from the battery, because as the voltage drops as the battery discharges, the measurements will change.
Furthermore, you must calibrate the CO2 sensor with the voltage that will be used later. If you calibrate the CO2 sensor with one voltage and later use the sensor with a different voltage, the measurements will be wrong.
The solution for using 5V CO2 sensors with battery power is to use a step up or "booster module". More on this here: Adding battery charger to ESP8266 and ESP32 (well done).
Note: The tutorial with the TTGO T-Display board and SCD30 CO2 sensor feeds the sensor at 3.3V (within the manufacturer's specifications) via an on-board regulator, so you don't have this problem. You have to pay attention if you replace it with another sensor.
Be aware that the temperature and humidity sensors are affected by the heat generated by the electronics of the meter (especially in very compact enclosures, where the temperature inside the enclosure can get quite high).
If you want accurate measurements, you will have no choice but to isolate these sensors from the rest of the meter's electronics.
You can make the displayed temperature closer to the real temperature by adjusting the "Offset" in the "Temp Config" menu. For example, I have set an Offset of 13.5ºC on the compact meter with TTGO T-Display board because it generates quite a lot of heat (relatively).
The SCD30, SCD40 and SCD41 sensors also automatically adjust the humidity deviations based on the temperature setting (offset) so that the measurements obtained are also quite close to reality.
Relative humidity is temperature dependent.
For the SCD30, SCD40 and SCD41 sensors, which adjust the relative humidity calculation based on temperature, if the temperature reading is not correct, the humidity will not be correct either.
Try to correct the temperature by applying an offset as indicated. here.
If you are using a Sensirion SCD30, SCD40 or SCD41 sensor, the temperature offset is processed by the sensor's own firmware (the program loaded into the sensor by the manufacturer).
The firmware of these sensors is implemented in such a way that the temperature offset is applied over time, so you will not see it applied all at once, but over several minutes.
Simply set the offset you need and wait several minutes and you will see it gradually take effect.
The battery voltage displayed on the screen is merely a guideline. The circuitry does not allow a very accurate battery reading and I do not think it is worth the trouble to improve this point.
If you want to have a more accurate voltage indication you can adjust the voltage reference in the "Battery config" menu.
When the battery charge is too low, the charger kicks in to recharge the battery. This additional charge can cause a drop in battery voltage. The magnitude of this voltage drop varies depending on the specific hardware you are using. It takes some time for the voltage to recover and rise above a certain threshold (currently around 4.45V) that CO2 Gadget uses to determine if it is running on external power.
As a result, it may take some time for the battery icon to reflect the switch to external power.
It is important to note that a similar voltage drop can occur when the CO2 sensor performs a measurement. For example, with an SCD30 sensor, the current can increase from around 70mA to over 270mA during a measurement, which can potentially cause the voltage to drop below the 4.45V threshold, leading CO2 Gadget to erroneously assume that it is operating on battery power.
This fluctuation may cause the battery icon to alternate between battery and external power modes.
Similarly, if the display is set to be on when connected to external power and off when on battery, the voltage drop when switching to battery mode may cause the display to turn off. This lower power consumption may cause the voltage to rise again, resulting in an on/off/on/off cycle, with the battery icon reflecting this behaviour.
It is worth noting that these problems can occur depending on the hardware used. While we cannot control the hardware on the board, the use of quality cables, a reliable power adapter and a good quality battery can help mitigate these problems.
Play around with the buttons and familiarise yourself with their behaviour. Test to get the feel of what is a long press and what is a short press.
Experiment with how text data (such as SSID and WiFi password) is entered.
At first it may seem a bit erratic and confusing but you will soon get used to it. You will see that the system is not difficult at all and allows us to do everything with just two buttons (otherwise we would have to put additional buttons).
The sensor is a delicate measuring instrument. You should take the following precautions when mounting it:
– Weld it fast, don't dawdle. The sensor is very sensitive to extreme heat.
- The sensor is sensitive to static electricity. Avoid touching the pins and components with your fingers as much as possible.
- Before touching the sensor, touch something with your hand, which is grounded, to discharge static electricity (e.g. a water or heating pipe).
- The sensor housing is not just a box, it is an active part of the sensor. Be careful not to put any force on it.
Normally everything will work the first time if you follow the tutorial step by step.
If you find yourself in the situation where you have already recorded the meter's firmware and don't know what it is doing, you can find out what is going on through the serial (USB) port on the board.
When you turn on CO2 Gadget and it starts to boot, it starts to pull information about its boot and what it is doing through the USB port.
You can view this information by installing a serial terminal program (Arduino IDE, Putty or other) to the USB port on your computer or simply by selecting the "LOGS & CONSOLE" option in the web firmware upload tool.
CO2 Gadget supports the following CO2 sensors:
Sensirion SCD30 Sensor (recommended)
Senseair S8 LP (recommended)
Sensirion SCD40
Sensirion SCD41
MH-Z19
Cubic CM1106
If you are going to use a 5V powered CO2 sensor it is very important that you read the point "How important is the power supply to the CO2 sensor?"
Yes. CO2 Gadget supports, and has been tested with, the following sensors connected via serial port:
- Senseair S8 LP
- MH-Z19 (A/B/C/D)
- Cubic CM1106 (and possibly the CM1107 although I have no reports from people who have tried it).
The pins to connect the sensor depend on the board you are using.
At the moment, there is support for generic ESP32 boards (almost any board) and the TTGO T-Display specifically.
CO2 Gadget supports many different boards and displays.
You can use a normal ESP32 development board, e.g. the ESP32 DevKitC-32D boardand how to display using, for example, a I2C OLED display with 128*64 pixel SSH1106 driver
Ask the Telegram group if you need help.
Yes, you can measure the voltage by connecting the battery positive to a pin on your board. In the table Pins used by CO2 Gadget you have the one used by default on your board.
Note that on most boards the maximum allowable value on this pin is 3.3V, while a fully charged li-ion battery can give 4.2V, so you will need to put a resistive divider on the input like this one, which divides the input voltage by 2:
You can use any 3.7v nominal Li-ion or Li-Po battery. It will depend mainly on the dimensions of the case.
The TTGO T-Display board uses a TP4056 charger chip without additional protections (overcharge only), so the battery must have, at a minimum, short-circuit, over-discharge, and over-current protection.
If the battery does not have internal protections, it would be advisable to install a protection plate like this or similar.
You can use a 128×64 pixel OLED SSH1106 display.
The OLED display has a high display qualityeven outdoors, with a fairly low power consumption (around 20mA).
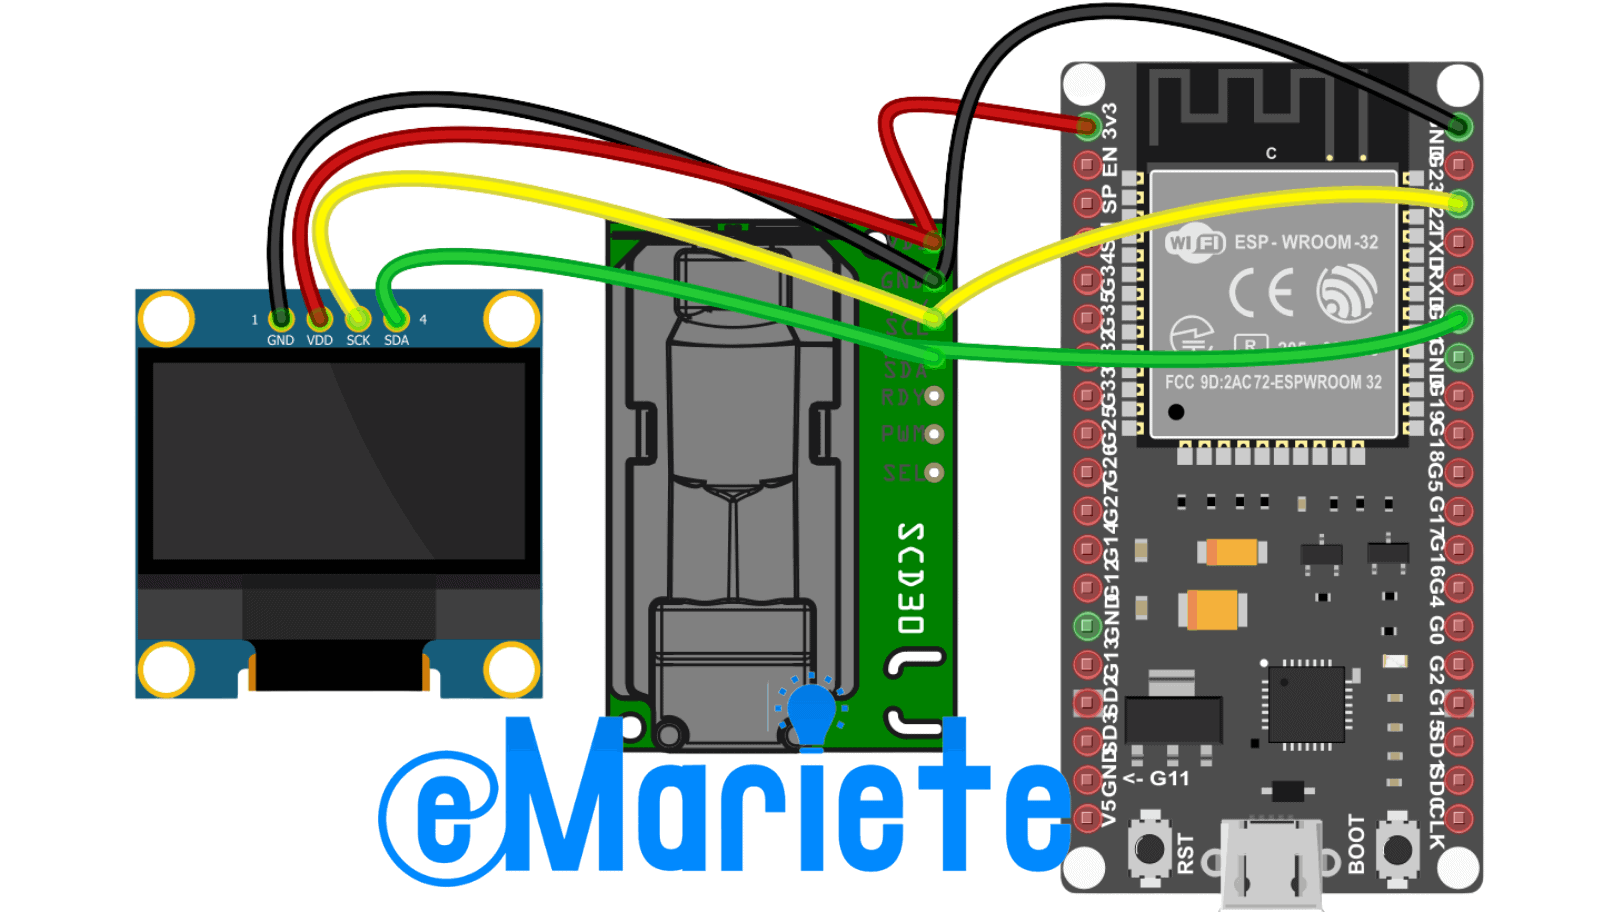
Its connection could not be simpler. It is connected via I2C bus, just like the SCD30 or SCD4x sensor, just connect it in parallel with the sensor. as shown in the diagram below. 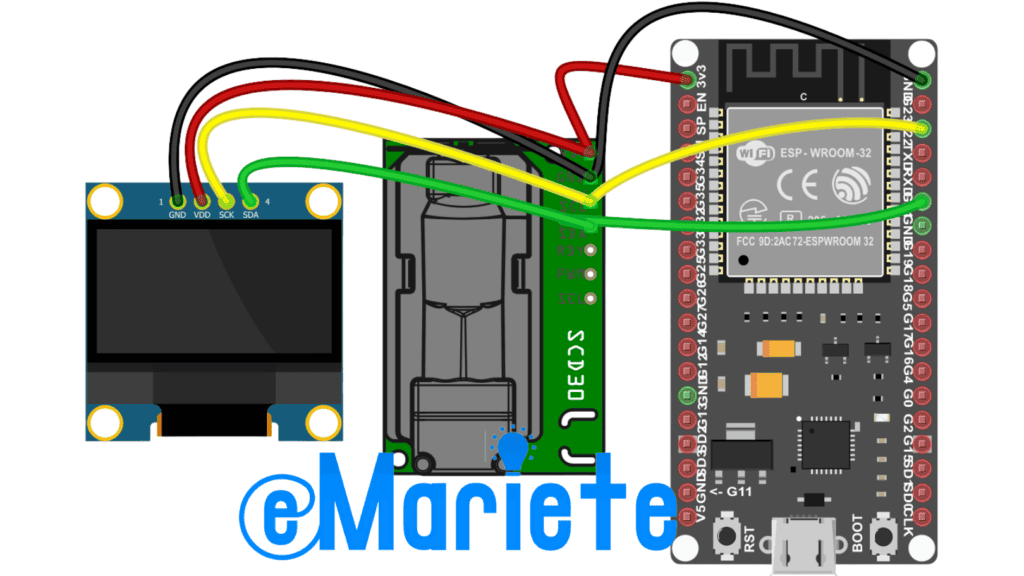
You can use the two CO2 Gadget outputs to connect relays or contactors to activate and deactivate extractors, fans, air cleaners, etc. when CO2 levels reach certain levels.
The concentrations at which these outputs are activated are customisable and match those you have configured in the options menu "...".CO2 Sensor"as orange and red colours.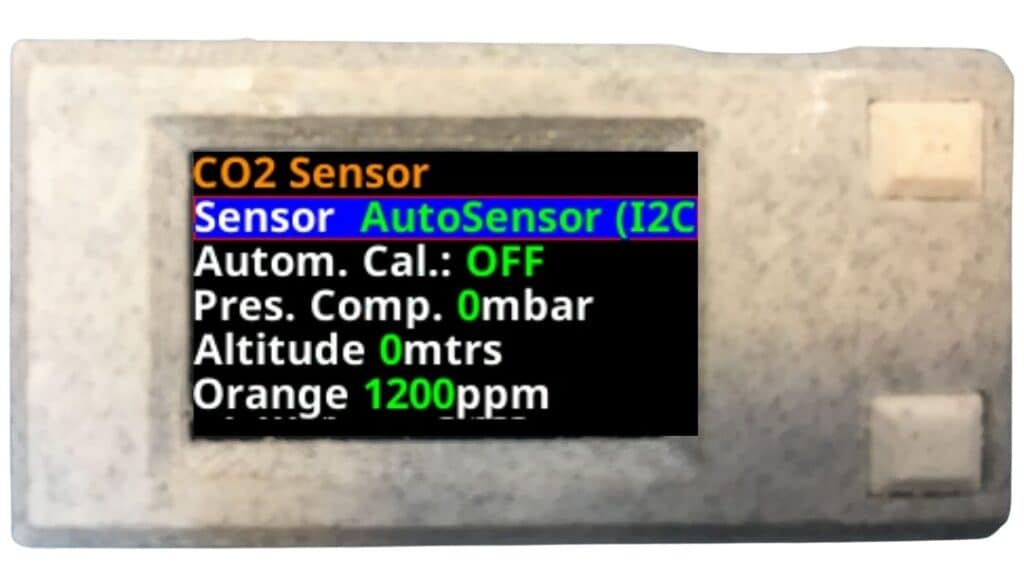
In this example, when CO2 reaches 700 ppm, CO2 Gadget will activate the orange output and when it reaches 1000 ppm it will activate the red output (the orange output will also remain active).
The red output will be deactivated when the concentration drops below 900 ppm (1000 ppm minus 100 hysteresis) and the orange output will be deactivated when the concentration drops below 600 ppm (700 ppm minus 100 hysteresis).
The 100 ppm hysteresis prevents the outputs from being switched on and off continuously if the concentration keeps fluctuating around the corresponding concentration.
mDNS (Multicast-DNS) support is not available on all computers, it depends on your operating system and its version. If you are using Windows and your version does not support mDNS, the quickest and easiest way to get it supported is to install the Apple Bonjour Print Services for Windows.
CO2 Gadget is constantly being improved and expanded and many new features are being added.
You have available a CO2 Gadget Roadmap where you can see what is planned and what stage of development it is at.
You can ask for the inclusion of a new CO2 Gadget functionality here. If there is something you don't find in CO2 Gadget and you would like it to be implemented, go ahead and ask for it. All requests are studied with great interest.
Not only can it be as accurate as a commercially available meter, but it can also is likely to be more accurate than a commercial meter.
For example, the SCD30 sensor, used in CO2 Gadget, is a better quality sensor than those used in the vast majority of commercial meters under €500 that you can find on the market.
The result will depend on how well you mount it and calibrate it correctly.
Read the article Are home CO₂ meters as reliable, accurate and precise as commercial ones? if you want to know more.
If you encounter any difficulties and need help or have any queries, you have two options:
1. Join the eMariete Telegram group . A group where we talk about cacharreo, where several users, and myself, will be able to help you. This group is mainly in Spanish.
2. Write your question, problem or request in the section CO2 Gadget Issues on GitHub (recommended for questions in English).
This article is intended for users of the CO2 Gadget firmware. For any issue related to your developmentIf you have any questions, problems or requests, please contact us at CO2 Gadget repository in project on GitHub.
For any issue related to developmentIf you have any questions, problems or requests, please contact us at CO2 Gadget repository in project on GitHub.
This article is intended for users of the CO2 Gadget firmware.
Can’t find the answer to your question? Join the community at Telegram or open a issue on GitHub.