
There's a new kid in town among the NDIR CO2 sensors. An old/new acquaintance of the maker community, a low-power NDIR CO2 sensor, the MH-Z1311A from Winsen.
Find out what we're finding out about this new sensor that we're sure to be getting a lot out of soon.
Contents
Thanks to the financial contributions of users of the eMariete Telegram group, @hpsaturn, @CarlosBA2, @TeddyTodd, @GLM_BCN, @Master_hogwarts, @erguro1973, @Roberbike, @AnCaMaAl, Josep and @CoscolinSergioWe have placed an order for two of these energy-saving sensors.
Thanks to your help, we have here first hand information on the MH-Z1311A and it can probably be supported by CO2 meters. CO2 Gadget y CO2 Easy.
Thank you very much for this great contribution!
UPDATE 19/2/2022 13:30: We have raffled a sensor among the users and the winner has been: @CarlosBA2(Carlos Botana). ¡¡¡¡Congratulations Carlos!!!!
The NDIR CO2 sensor MH-Z1311A
The latest addition is the energy-saving sensor MH-Z1311A. A sensor that, although it does not continue with the MH-Z19x nomenclature, clearly seems to be an evolution.
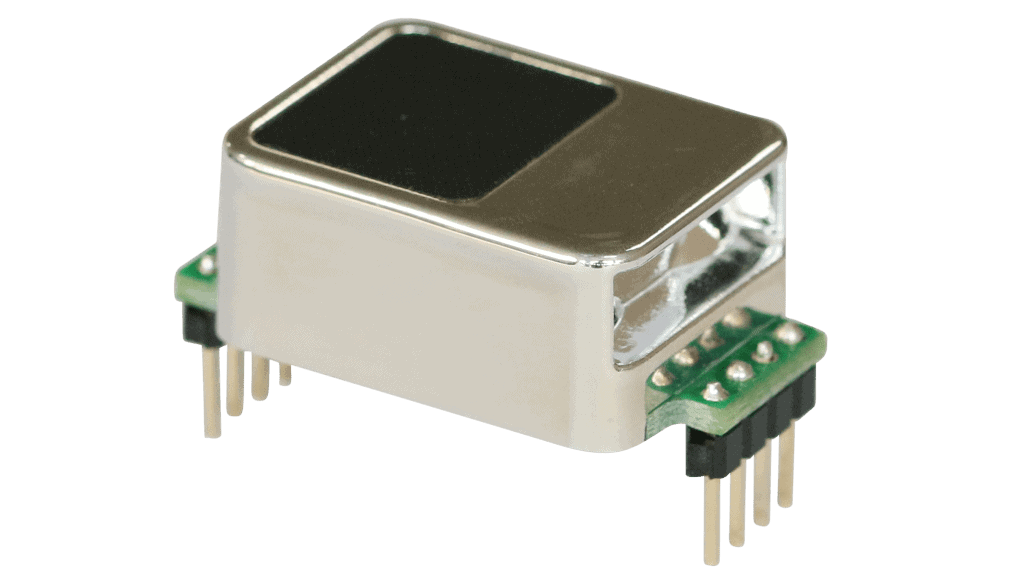
Physically it is practically the same in terms of size and connections.
Its casing this time imitates aluminium, although it is still plastic, like that of the MH-Z19 (yes, both are plastic, although they look metallic).
This sensor stands out because it announces a average consumption of less than 1mAh (yes, specifically a power consumption of less than 800 µAh).
Even their communication protocol is virtually identical, so many projects prepared to work with the MH-Z19 will work with no (or minimal) adjustments with the MH-Z1311A.
Here are two interesting technical documents of the Winsen MH-Z1311A CO2 sensor, its datasheet and the document describing the protocol:
Calibration of the MH-Z1311A
IMPORTANT: As stated by the manufacturer, it is essential that, during the manual calibration process, the sensor is operated beforehand for the duration of the calibration, at least 20 minutesin a stable CO2 environment with a CO2 concentration of fresh air, 400ppm (outdoors or by a window, for example).
Hardware calibration
If we have physical access to the sensor connections, we can easily start the zero point calibration procedure by jumpering terminals 5 (HD) and 7 (GND) for 7 seconds.
Before performing the procedure, make sure that the sensor has been at a stable concentration of about 400 ppm for at least 20 minutes.
Software calibration
The sensor has a command that will instruct it to perform the zero point calibration at that moment.
Calibration can be performed at a concentration between 400 and 1000 ppm.
It is important that you comply with these three points before performing the calibration:
- The sensor has been on for more than 2 hours
- The CO2 concentration of the sensor in the current environment must be between 400 and 1000 ppm and cannot exceed this range, otherwise the sending of this command will be invalid.
- The CO2 concentration in the environment should be stabilised for more than 10 minutes before sending this command, otherwise the calibration deviation will be relatively large.
To learn more about calibration, I recommend that you read the following article, as this sensor is very similar to the MH-Z19 and, except for the above, everything else is common with him:
My impressions
Without a doubt, the best thing is that its compatibility with the main commands of the very widespread NDIR sensor MH-Z19. This makes it possible to equip many existing CO2 meter projects with a low-power NDIR sensor.
This is especially useful when you want to use the CO2 meter with batteries because The MH-Z1311A consumes approximately 60 times less power than the MH-Z19B.This can allow the meter's autonomy to be extended several times.
Another very interesting feature is that programming and use is extremely easyEspecially when compared to other existing low-power sensors that have a rather cumbersome communication protocol and many options (for better or worse).
Review of the MH-Z1311A
I'll start by leaving this video preview here, although below you'll find much more information that doesn't appear in the video:
In the meantime (today is 16 February) I am still doing the sensor analysis and entering the information here so you will continue to find frequent updates, until the analysis is finished.
Unboxing and first impressions
As I told you before, we have ordered TWO MH-Z1311A sensors directly from Winsen via their official AliExpress shop.
The order has arrived in Madrid from the official Winsen shop on AliExpressI have ordered from Winsen in China in about three weeks and as with other times I have ordered from Winsen the packaging is perfect.
It comes in a robust box, with a large amount of absorbent material and the sensors placed in electrostatic foam.

It is accompanied by an inspection report containing some interesting data, such as the accuracy or the inspection points with their results.

As for the accuracy, it is curious that in the document it indicates that its accuracy is +/-50ppm+5% of the reading, when in the datasheet it says that it is +/-30ppm+5% of the reading.

The document states that CO2 concentration measurement tests have been carried out at 400 ppm, giving a result of 405ppm and at 2000 ppm, giving a result of 1980ppm, which is very good.
Consumption analysis of the MH-Z1311A
Low power consumption is supposed to be the main advantage of this sensor. Let's see if this is true by doing some tests and measurements...
The manufacturer indicates in its datasheet that the power consumption is less than 0.8mA (yes, only 0.8mA). 800 µAh) Is it true?
We set to work, using a Power Profiler Kit II from Nordic Semiconductor to carry out the measurements.

We measured the power consumption of the sensor with nothing connected except the power supply, and the measurements give the following results:

We can see the following interesting points:
- The average sensor consumption is 1.4mA
- The maximum peak consumption is just under 230mA.
Peak consumption of 230mA emissions occur every half a minute and are supposed to be when the sensor makes CO2 measurements and, although of high intensity, they are very brief.
We have other more frequent peaks, of about 80mA, where the sensor's microcontroller is supposed to wake up and do "something" (probably dealing with communications in case there is a command coming through the serial port or one of the pins).
Here we can see the 230mA peak in detail:

We can see that:
- The peak consumption while the sensor is making its measurement lasts for only 259µs (microseconds) so it does not contribute much to consumption, even if consumption is high during that short period of time.
- The average power consumption during the 259µs CO2 measurement is 71mA.
Regarding these faster peaks, with a higher periodicity and lower consumption, you can see them here:

The most important thing is:
- Occur every 500ms
- The consumption at each peak is 78mA.
- Average consumption is 1.38mA.
I leave you also the detail of each of these quick peaks:

Note that the spout is really short, it lasts only 228µs.
CONCLUSIONS:
Sensor consumption is very good, 1.4mA averageThis can help a lot in battery-powered projects without having to go for ultra-low-power sensors, which are much more difficult to integrate into the code. However, it is almost twice the power consumption of what the manufacturer promises in the datasheet (less than 0.8mA).
Analysis of the MH-Z1311A protocol
One of the great advantages of this sensor, which will be very important for many, is that, on paper, the compatibility of its protocol with the very widespread MH-Z19B sensor should be total.
This is certainly very attractive as it means that we could take any existing project that uses the MH-Z19B and just swap out the sensor for this one and we could greatly increase the battery life.
Below, I show you the communication protocol analysis and reverse engineering of the MH-Z1311A to check if this is the case.
This is not an exhaustive analysis, as no "..." has been sought.hidden commands"Nor have I tested commands that exist for the MH-Z19 but are not documented for the MH-Z1311A, and that many of them are likely to work. It has simply been verified that the protocol is the one published by Winsen in the document he has sent us.
I used two instruments for the analysis of the protocol:

A logic analyser with Seale software.
Captures serial communications TTL, I2C, etc. and decode the protocol.
The truth is that it is an essential tool in the arsenal of any microcontroller tinkerer's arsenal.

A oscilloscope Loto Instruments OSC482L with logic analyser.
I use it for low-level analysis of the communication and analysis of the analogue interface of the serial port.
Although I have a "professional" desktop oscilloscope (a Rigol DS1054Z) it is this small, inexpensive USB oscilloscope that I use on a day-to-day basis.
In addition, I will use the terminal and communication software SerialCommunicator for sending commands to the analyser and capturing and analysing hexadecimal data together with a USB to serial/TTL adapter:
No products found.
Receiving data
The first test consisted of replacing the MH-Z19C sensor connected to a working Gadget CO2 meter with the MH-Z1311A sensor, without any prior investigation:

The meter starts working immediately without any apparent problem...
This test is definitive as it proves that it is possible to replace the MH-Z19, in an already functioning CO2 meter, with the MH-Z1311A without additional modifications.
Next, to further investigate the protocol, what I do is to connect, while still connected to the CO2 Gadget, the two lines (RX and TX) of the MH-Z1311A sensor to two channels of the logic analyser and open the Seale software to capture any data sent or received by it.
This is the result, the raw data sent by the MH-Z1311A:
Sending commands
According to the Winsen document describing the protocol, the MH-Z1311A sensor includes only the following commands:
- 0x86: Reads CO2 concentration (same as MH-Z19)
- 0x79: Enables or disables automatic calibration (same as MH-Z19)
- 0xADPerform calibration at a concentration between 400 and 1000 ppm.
In addition, I tested the following command, because, although it is not documented, it was important to know if it was supported for compatibility with projects made with the MH-Z19. The command worked correctly, which is great news for being able to directly replace the MH-Z19 with the MH-Z1311A when we want to save energy.
- 0x87Calibrate Zero Point: Calibrate Zero Point. It is like the 0xAD command but calibrates to a fixed concentration of 400 ppm.
I'm working on it... I'm still writing the article, come back soon...
How does it measure?
I will test CO2 measurements and they will appear here.
I will also check, as with other sensors, how the variations in supply voltage suit it.
Conclusions
I'll write it down when I'm done... I'll leave some unconnected notes for myself:
Although its consumption is higher than the manufacturer indicates, it is a very good sensor if we want to increase the autonomy of our meter.
The power savings are not up to the level of an ultra-low-power sensor such as the Senseair Sunrise S11 or Cubic CM1106SL-NS (nor are they expected to be), but it is much easier to use and its compatibility with the MH-Z19B makes things much easier.
I would like to comment on a few points regarding the "production quality of the sensor" as it seems to me to be rather low as a finished product. It looks more like a prototype:
- It looks like the datasheet has been written in haste, with little care, using parts of the MH-Z19B datasheet (even the pictures are those of the MH-Z19B).
- I also didn't get a good vibe from the fact that the sensor appeared in the Winsen shop for a few days and then disappeared without trace a few days later. I wonder if it will still be on sale.
- On the Winsen website in English the sensor is non-existent. In the Chinese version there is only minimal information about it, with hardly any information at all.
As in the case of the MH-Z19C and MH-Z19DThe supply voltage is between 4.9V and 5.1V, a very narrow range that can be difficult to achieve without a step-up-down (almost essential for battery operation, which is what a low-power sensor is intended to do).
What is the price of MH-Z1311A?
It is a very recent sensor and it is not yet clear what its price will be. Winsen put it on sale in its AliExpress shop for only a few days and withdrew it...
The two units of the MH-Z1311A that we have purchased have cost us 90 incl. shippingIs this expensive or cheap?
It is difficult to say if it is expensive or cheap, it will depend on how each person values it. It should be noted that the price of an ultra-low power sensor such as the Senseair Sunrise S11 (model 006-0-0007) at the time of writing this article is €55.94 + VAT (€67.69 inc. VAT) at Digi-Key.
The MH-Z1311A is about 30% cheaper than the Senseair Sunrise S11, but of course, while the Senseair Sunrise S11 is a true ultra low consumption (with an average power consumption of 45μA) the MH-Z1311A is simply a low-power sensor (which consumes thirty times more). It is also true that the MH-Z1311A requires much simpler code to operate.