
We've seen a lot of great home projects using solar panelsBut the reality is that energy efficiency is a battleground. If you have tried to power a ESP32 or a Raspberry Pi with a small solar panel from  and you have failed, you are not alone.
Este post complementa nuestro proyecto sobre Enerlogic — Energy Wizard y explica la dura verdad que aprendimos: la energía de low-power solar panels requires a very high level of electronic intelligence to function properly.
Contents
- 1 The Silly Mistake: Why You Should NOT Measure Your Panel in Milliamps
- 2 The Nominal Power Deception (The y-Factor)
- 3 The Critical Load: Peak Power Consumption and Current
- 4 How to Measure Real Energy and Find MPP with a Multimeter
- 5 Invisible Electronics: MPPT Solar Charger (The Secret of Efficiency!)
- 6 The Master Example: Solar LED Outdoor Lights (Smart Simplicity)
- 7 Practical Example: Dimensioning and the Cruelty of Deep Sleep
- 8 Real Expectations: Hours of Peak Sunshine (HSP)
- 9 Common Ignorance Mistakes (And Why They Fail)
- 10 Conclusion: Oversizing your Solar Panel and using MPTT is the Solution
- 11 And now what?
The Silly Mistake: Why You Should NOT Measure Your Panel in Milliamps
Let's first establish something very important: what is useful for identifying the energy that a solar panel can generate and what is not.
It is very common to hear people say: "My panel pulls out  ". This metric is completely inadequate to assess the performance of a solar panel. To say that a panel "takes out" is like saying nothing.
- Short Circuit Current (
 ): The value that many people measure with an ammeter is the short circuit current (), which is the maximum current that the panel can deliver with no load (voltage at zero or near zero). This current is useless for charging anything!
 - Current in the MPP (
 ): This is the current delivered at the point of maximum power.
The only metric that really matters is the Power in Watts ( )as the watts combine both the current (
 ) as well as the voltage (
 ).
).
![\[P = V \times I\]](https://emariete.com/wp-content/ql-cache/quicklatex.com-c3249f1fb023c90dda75263a7f02f12c_l3.png "Rendered by QuickLaTeX.com")
A  can give
  a
a  o
o  to
to  . Both combinations give , but the working voltage is completely different. Whichever system you use (charger, battery) only works if it receives the correct combination of
  e
e  .
.
Here is the real test, carried out by me
I am using a 6V 1W 110 x 60mm solar panel bought on AliExpress (click here to see it).
I measure the voltage supplied by the solar panel without load: 
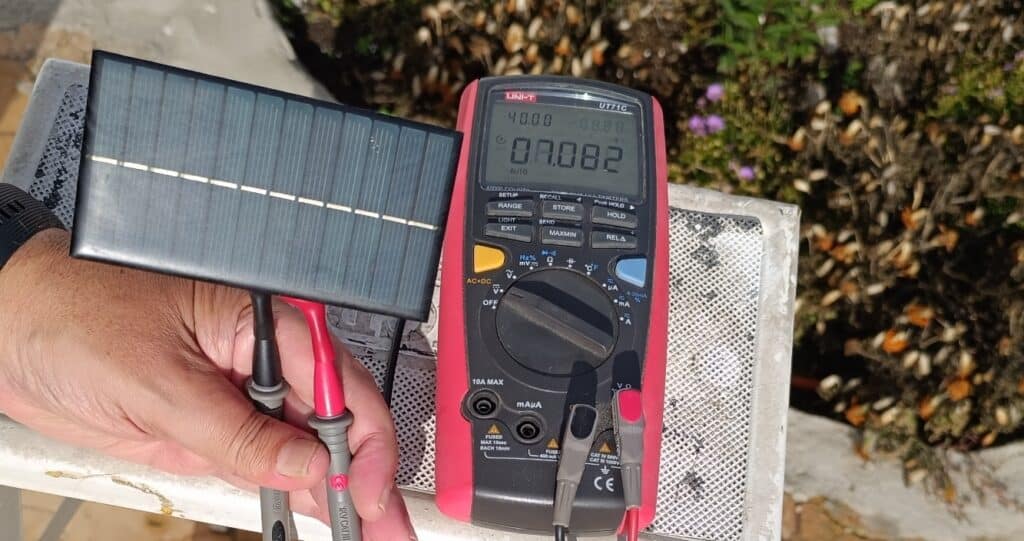
I measure the amperage supplied by the shorted solar panel: 
According to this, and applying the power formula, which we have seen before (P = V x I), this panel can give: 0,82W (not bad, right, it's not even a summer day, it's December!!!).
That is the theory. The reality is that when we make a proper curve IV, utilizando mi herramienta Enerlogic — Energy Wizard:
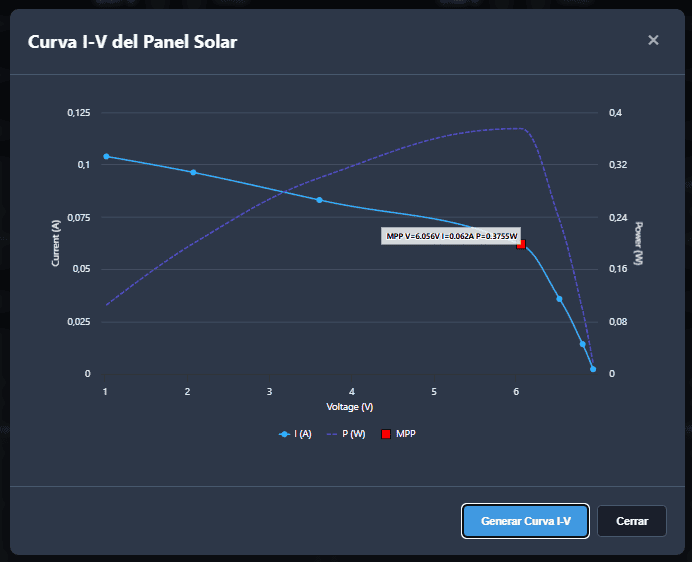
The maximum power that this panel can generate when it is working at its best point (the "MPP point") is just  The average for the first time, it is not even half of what we measured before.
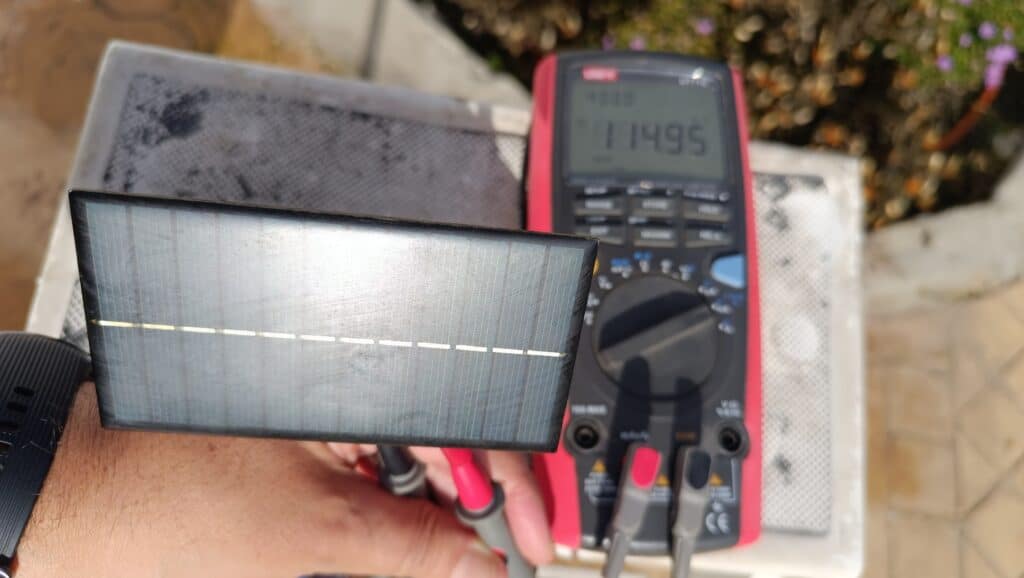
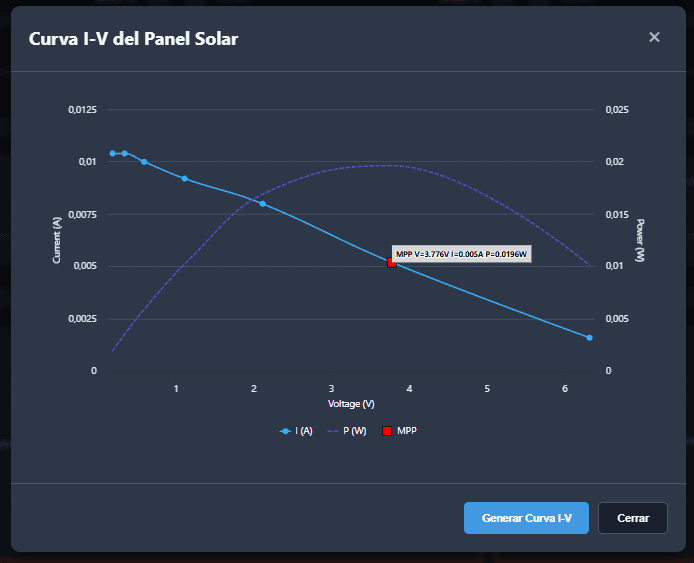
It should also be noted that these conditions change rapidly. A couple of hours later, the same panel, in the same place (redirected again directly to the sun) generates an energy of only  The reason? It has become cloudy and the sun is lower...
In addition, the MPP voltage is now  when it used to be
Conclusion: High amperage with low voltage means unusable power. Always evaluate the performance of your solar panel and the consumption of your circuit in watts for the comparison to make sense.
The Nominal Power Deception (The Factor  y
y  )
)
When you buy a panel of that figure () is determined under ideal laboratory conditions, known as the STC (Standard Test Conditions):  of irradiance,
  temperature.
In practice, these conditions are rarely met, and this is the biggest deception in solar sizing:
Actual solar radiation is rare, if ever,reaches used to calibrate the panels.
Royal Example (Madrid, 7 December):
The graph of the weather station at my home in Madrid, Spain, on 7 December 2025 (winter) shows that the maximum solar radiation reached was  at 14:20hand only for a brief moment.
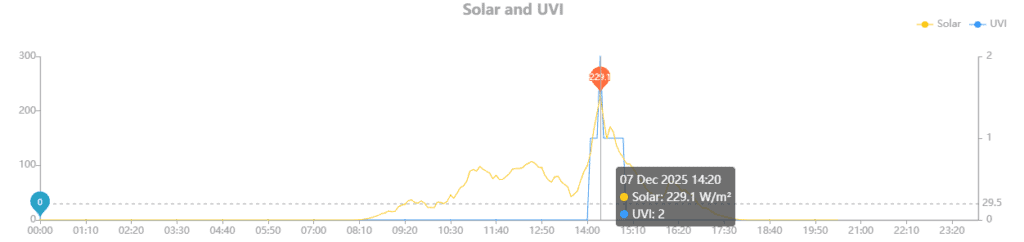
If your panel is is based on at the peak of that day you only received the  of the rated power (
 ).
).
That is to say, your panel of only produced, at most,  . And this was only at one point in the day, the rest of the day produced much less energy.
- Temperature and Losses: High temperatures in the summer reduce the efficiency of the solar panel by itself.
- Clouds and Dirt: Any partial shade or cloud cover drastically reduces production.
Conclusion: Your panel of may only deliver  a
a  in summer, let alone in
  This difference is critical!
The Critical Load: Peak Power Consumption and Current
Modern microcontrollers, especially those using wireless communication, are energy predators at times.
The ESP32for example, has a low baseline consumption, but when you activate the Wi-Fi to transmit data, consumption can spike significantly over a period of time.
If your panel is a  gives you, nominally,
  a
a  is this enough to charging the battery And feed that peak of
  or more?
Most of the time, the answer is no. If the battery is not being recharged at a sufficient rate by the panel, the energy is progressively depleted and the system collapses.
Golden Rule: The panel does not power the circuit; the panel charges the battery, and the battery powers the circuit.. If the panel is too small, the battery will drain faster than it recharges.
How to Measure Real Energy and Find MPP with a Multimeter
If you don't have a curve analyser I-V costly, you can get a good estimate of the real power of your panel and its Maximum Power Point (MPP) using a multimeter and a variable resistor (or a resistor bank).
Note that the resistor has to be able to dissipate the heat generated by this energy, so power resistors or a rheostat are normally used.
Step 1: Find the MPP ( e )
e )
The aim is to find the exact point of voltage and current where the multiplication of both gives the highest value ().
- Measure Voc: It measures the Open Circuit Voltage (
 ) with the panel disconnected (no load, battery or charger connected). This sets the maximum possible voltage.
 - Add Variable Resistance: Connect a variable load resistor (or power potentiometer) to the panel outputs. This resistor simulates the demand of your charger. Make sure the resistor is powerful enough to dissipate the heat.
- Iterative measurements: It adjusts the resistance in small steps and, at each step, it simultaneously measures the Voltage () through resistance and Current () flowing through it.
- Calculate Power: Use the formula
 to calculate the power in watts at each measurement point.
 - Identify the PPM: The pair (, ) resulting in the highest power () is your MPP. This is the ideal voltage () that your shipper should try to maintain.
Step 2: Measure Total Energy Generated ( )
)
Energy is measured in watt-hours ( ), which is power () per time (
 ).
).
- Establishing the Charge: It uses a fixed resistor to simulate the load on your circuit, or simply connect your MPPT charger. Ideally, the load should maintain a voltage near the you found in Step 1.
- Power Register: During a sunny day, take readings of Voltage () y Current () at the panel output (or input to the charger) at fixed intervals, for example, every hour from 8:00h to 18:00h.
- Calculate the Average Power: For each one-hour interval, calculate the Power ().
- Sum of Energy: Sum the power of all the intervals to get the Total Daily Energy (). If you took hourly readings, the sum of the measured watts is directly the total energy at .
Example of Sum: If at 10:00h you obtained
and at 11:00h you obtained
you have accumulated
in that two-hour period.
This process will give you the real energy that your panel is delivering at your location and under the current climatic conditions, which is much more useful than the nominal value of .
As you can see, both are tedious processes, that take a long time and require many manual steps where you have to go modifying parameters and making measurements and calculations.
To find the MPP ( e ) you will have to do many measures in a very short space of timeand at each one vary the load manually, or each point of your measurement will be with a different solar radiation (the sun's energy changes continuously and rapidly).
To measure the Total Energy Generated (), it will not be enough to measure every hour every hour, the accuracy of the measurement you get will be very low. You may have to measure every 5 minutes and this is tedious.
This is why these measures on solar panels, although conceptually very simple, are very difficult to do in practice without an appropriate measuring instrument, to automate it.
Invisible Electronics: MPPT Solar Charger (The Secret of Efficiency!)
The rated power of the solar panel is irrelevant if you don't have the electronics for extract it efficiently. This is where the load controller.
The Maximum Power Concept (MPP)
Solar panels have an ideal point of operation where the combination of voltage and current produces maximum power: the Maximum Power Point (MPP).
If the charger or circuit demands too much current from the panel, the output voltage collapses (moves away from the MPP). When the voltage drops, the power delivered drops drastically, wasting much of what the panel could have delivered.
The power that your solar panel generates is directly linked to the cargo you connect to it. If the connected circuit draws too little current (very high resistance), the panel operates at its rated current. Open Circuit Voltage ()which is high, but the current is almost zero, so the power is low. Conversely, if the circuit demands too much current (short circuit), you will get the maximum current (), but the voltage will be zero, and the power will return to zero.
![Current-voltage graph with vertical axis labelled 'Current [A]' and horizontal axis 'Voltage [V]', showing a dark almost flat I-V curve falling sharply to the right and a red P-V curve rising to a peak marked by arrows as 'Point of maximum power', with dashed vertical and horizontal lines indicating the voltage and current at that point.](https://emariete.com/wp-content/uploads/2025/12/Curva-IV-Energia-Paneles-Solares.png)
As you can see in the following graph where all possible combinations of voltage and current of the panel have been measured, there is only one point where the panel was generating  and this is when we load the panel with
  and this one delivers
  (the red square). All other load combinations generated much less. The purple curve is the maximum energy that the panel can generate depending on the load it has.
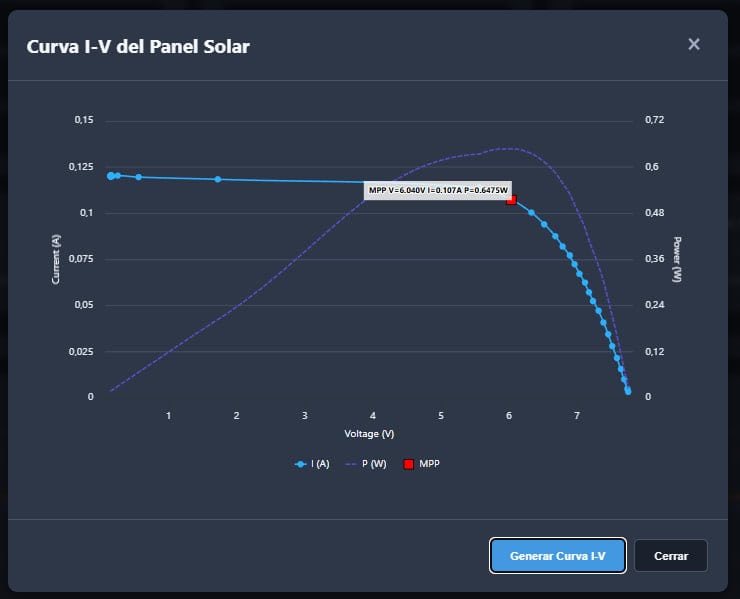
Between these two extremes, there is a single ideal point where the power curve (W) reaches its maximum peak: the MPP. The purpose of the charge controller MPPT is precisely to manipulate the panel load (the input impedance of the charger) so that the panel voltage is maintained. exactly at that optimum point ()This ensures that you get the maximum power possible in all lighting conditions. If you can get the panel to operate at this voltage, you will get the maximum possible power in any light condition. the resulting power will be the highest power that the panel can deliver at that time.
The Synergy: Specialised Solar Charger
Not every charger is suitable for every solar panel. It is ABSOLUTELY CRITICAL to use a solar charger designed specifically to operate with solar panelsnot just a USB charger.
| Type of charger | Main Design | Why is it CRITICAL with solar panels? |
| MPPT (Maximum Power Point Tracking) | It uses algorithms to search for the MPP. | Essential: Maximizes efficiency (up to  more than others) by ensuring that the panel is always working at its best power point, crucial when light is scarce and you have low-power solar panels. more than others) by ensuring that the panel is always working at its best power point, crucial when light is scarce and you have low-power solar panels. |
| Linear Chips (e.g. TP4056) | Designed for fixed voltage input (typically 5V USB). | Inadequate: They do not have the intelligence to search for the MPP, forcing the panel to a suboptimal voltage and wasting most of the power you need. |
If you are already struggling with a low-power solar panelyou need a smart charger MPPT (such as chip-based CN3971 o MCP73871) to ensure that scarce power is used to its full potential.
The Master Example: Solar LED Outdoor Lights (Smart Simplicity)
So, if efficiency is so critical, why do those cheap LED garden lights work so well with solar panels tiny?
The key is that its design is not based on raw power, but rather on the ingenious simplicity:
- Fixed and Minimum Consumption: They do not use Wi-Fi or peak consumption. They have zero consumption during the day (while charging) and constant/fixed consumption of just a few milliamps overnight onlyThis greatly simplifies energy management.
- The Charge Doesn't Need to be Perfect: They use a very simple linear charging circuit. Because the power consumption is so low, even if the charging system is inefficient (it does not operate at MPP), the panel generates enough energy to compensate for that loss during the day.
- The Panel as a Sensor: The panel not only charges, but also detects light. When the panel stops producing voltage at dusk, it activates the switch that turns on the LED.
Lesson: The basic solution works only for basic and minimalistic needs. Your project (with connectivity) is simply not a basic need and therefore cannot afford the luxury of inefficiency.
Practical Example: Dimensioning and the Cruelty of the Deep Sleep
Let's see why the belief that is sufficient for many projects with ESP32 is misleading. Consumption rules over generation.
Scenario: Thermometer with ESP32 connected to a battery charged by an ESP32 panel. .
Option A: Optimised Project (Using Deep Sleep)
Behaviour: ESP32 wakes up every 5 minutesreads a sensor, connects to Wi-Fi (high overhead), sends data and then returns to Deep Sleep (minimum expenditure).
- Maintenance and Autonomy Calculation: The daily consumption to maintain the system (including losses and margin) is approx.
 (this value is calculated assuming a consumption of
  at Deep Sleep and a peak of
  for 3 seconds per Wi-Fi connection).
 - Minimum Panel Power: Let's use the lowest Peak Sun Hours (PSH) in winter (Madrid):
 .
.![\[\[\text{Minimum Power} = \mathbf{0.4\Wh} = \mathbf{0.16\W}].](https://emariete.com/wp-content/ql-cache/quicklatex.com-488c1f18675b4eefc1b4465d9703860f_l3.png "Rendered by QuickLaTeX.com")
- Conclusion: Your panel of (which produces
 ) is sufficient and even oversized, as long as you use Deep Sleep. The problem here is the load efficiency (you need MPPT).
Option B: Unoptimised Project (No Deep Sleep)
Behaviour: ESP32 is maintained constantly connected and active (as if you were doing streaming data 24/7).
- Daily Consumption Requirement:
 .
. - Power produced by your panel :
 (in winter).
 - Conclusion: The panel only generates the
 of the energy the system needs. The battery will die within a day. No matter how good your MPPT charger is, the power just isn't there!
The Lesson: The difference between
y
is what condemns your project. It is
more efficient to optimise the code (Deep Sleep) than to try to optimise the generation (MPPT), although both are necessary.
Real Expectations: Hours of Peak Sunshine (HSP)
When sizing a solar system, we ignore the hours of visible sunlight and focus on the hours of visible sunlight. Hours of Peak Sunshine (HSP). An HSP is an hour of sunshine with an ideal irradiance ().
Attention, Key Concept!
When we say that "In the summer, HSPs can be  hours/day" does not mean that the panel is producing its maximum output of during those 5 or 6 hours.
HSPs are a value equivalent y averaged. That is, the total amount of energy you receive during the many hours of sunshine (from sunrise to sunset, where the intensity varies from  a and vice versa), is the same as if your panel had been generating a maximum power () for only 5 or 6 hours of the day.
- In summer, HSPs can be hours/day.
- In winter, HSPs can fall to
 hours/day.
Medium Power is Low! A panel of only produces  a
a  per day in winter (based on
  HSP). If your project is more complex, this low production is the main reason for the failures.
![Graph with a blue bell-shaped curve showing irradiance throughout the day, with a yellow rectangle centred around noon highlighting peak solar hours and a double black arrow indicating its width; axes labelled 'Irradiance [W/m²]' (vertical) and 'Time of day' (horizontal).](https://emariete.com/wp-content/uploads/2025/12/image.png)
Common Ignorance Mistakes (And Why They Fail)
The pursuit of simplicity leads to disastrous failures in projects that use low-power solar panels:
- Direct Connection ("Peeled Panel"): Attempt to connect a panel directly to a battery or circuit.
- Failure: The panel does not operate in its PPMThe battery is then damaged by overcharging or over-discharging, producing a tiny fraction of its capacity. A panel of
 connected to a Li-ion battery of
  can overload it and cause serious damage or even fire. The charger is not just efficiency, it's safety!
- Failure: The panel does not operate in its PPMThe battery is then damaged by overcharging or over-discharging, producing a tiny fraction of its capacity. A panel of
- The Mismatched Charger: Use a simple charger designed for USB (5V fixed) with a higher voltage solar panel (9V or 12V).
- Failure: The panel is forced to a voltage that is not its MPP, and the efficiency is drastically reduced, making the project unfeasible.
- Omission of the Blocking Diode: Do not use a diode (or a charger that integrates a diode) to prevent the energy from the battery is discharged back into the panel when it gets dark.
- Failure: The little energy you charged during the day is lost at night.
Conclusion: Oversizing your Solar Panel and using MPTT is the Solution
The final lesson is clear: if you use low-power solar panelsyou need smart electronics in electronics and margin for error.
For the  amateurs, to invest a little more in a solar panel is the best solution to avoid headaches. Switching from a
  o
o  not only provides more energy, but also guarantees:
- System stability (higher margin at peak consumption).
- Increased load efficiency (allows the MPPT to work better).
- Battery longevity (avoid deep discharges in winter).
Don't get caught up in the cheap price tag. An undersized solar panel, no matter how good the rest of your electronics are, will condemn you to an unstable or inoperative project.
It is very important, where possible, to design hardware and firmware with energy efficiency in mind, as you can see in the following post.
And now what?
We have established one fundamental truth: the success of your projects with low-power solar panels is not only about generation (MPPT), but also about consumption optimisation (on hardware y software of your project). You already know that your only produces a fraction of what is nominal, and that it is easier to reduce demand than to increase supply.
But the work does not stop here. The key to long-term success is the measurement and characterisation of your components.
- Next Step: Advanced DIY Test and Measurement Instrumentation
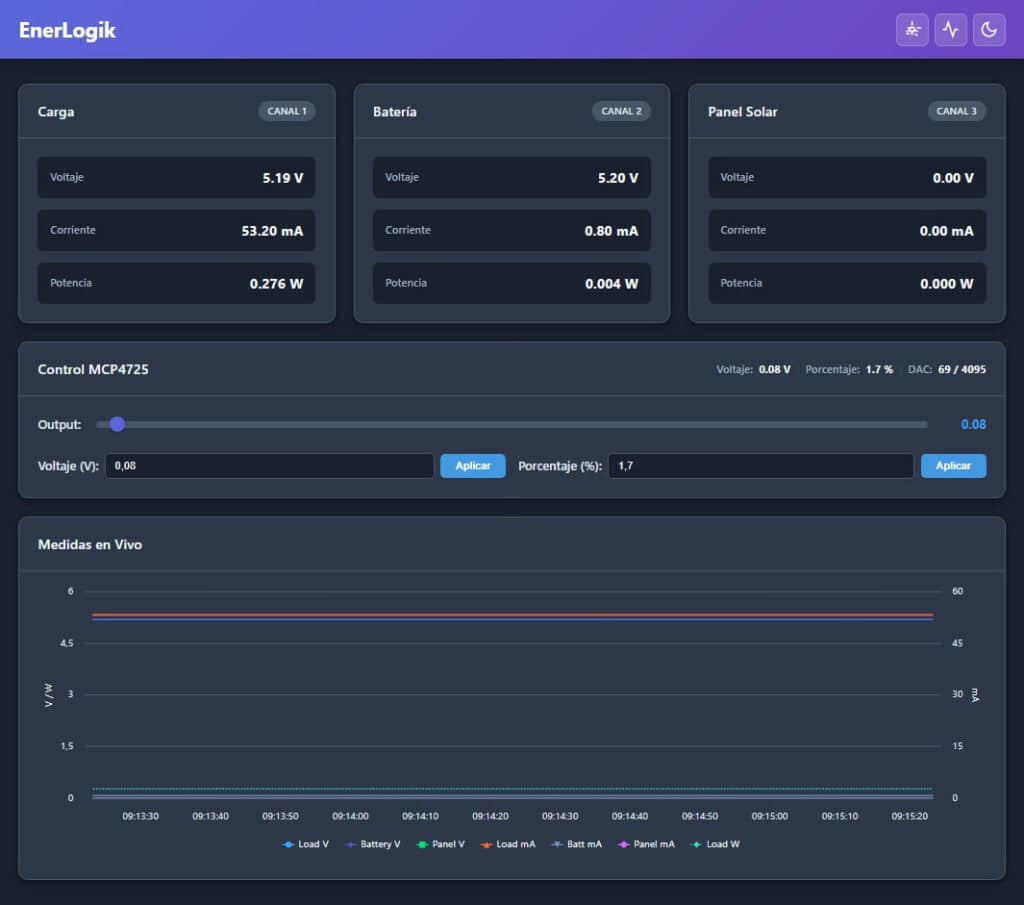
To stop relying on assumptions and start measuring real energy, I will soon publish a cool project of a advanced DIY test and measurement instrumentthe Enerogik. This instrument is used to characterise:
- Solar Panels: Get your actual curve
 to find the exact MPP.
 - Batteries: Know their capacity and status.
- Chargers and Feeders: Evaluate their efficiency and performance in a way that easy, precise and automatic.
- The Critical Hardware: Specific Solar Chargers
Finally, since we have already stressed that the choice of charger is ABSOLUTELY CRITICAL, we will soon provide you with a comprehensive guide to solar chargers for small panels. We will analyse in detail:
- Specific boards with MPPT chips such as CN3971 and MCP73871.
- Analysis of the most common plaques (including those to avoid).
- Tips for connection and configuration of the load.
Subscribe to our notifications channel so that you don't miss the construction of the measuring instrument and the guide for hardware your project needs!