Contents
- 1 ESPEasy configuration
- 1.1 Activating the ESPEasy rules engine
- 1.2 Add a rule so that when it is switched on, the LEDs are switched off.
- 1.3 Add a rule to change the colour of the LEDS depending on the CO2 level.
- 1.4 Control the switching on and off of the LEDs with a switch and have them flash on and off at certain times and that, and that, and that, and that....
- 1.5 Adding a ruler to make an LED traffic light
- 2 Step-by-step video tutorial
Do you want to connect WS2812 LEDs to a ESP8266 with ESP Easy? In this tutorial I will show you how to do it easily.
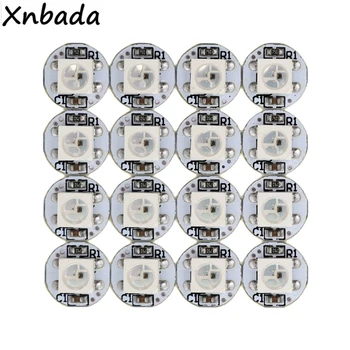
The WS2812 LEDs (also called NeoPixels) are fantastic and give us incredible possibilities and flexibility.
The WS2812 are presented both individually and in stripsThe RGB strip lights up in one colour at a time, but whereas a normal RGB strip lights up in one colour, in this case we can control each LED independently.
These are LEDs that can be connected in parallel, connecting as many as we want with only three wires. we can control them one at a time. We can switch some on and others off, set each one to the colour we want and regulate their intensity independently.
These LEDs are called RGB LEDs because they are each of them has the three basic colours (red, green and blue). This means that we can achieve many, many colours by combining these three basic colours (including the white, if we light the three colours together with the same intensity).
In addition, powered at 5 voltsThis makes assembly much easier, as no additional power supplies are required. We can use the same power supply of a NodeMCU or Wemos D1 Mini or put a separate mobile phone charger to power them (or another larger power supply if there are many LEDs).
Just one thing to keep in mind: each colour of each LED, switched on at 100%, consumes 20mA. Each LED has three colours. This means that one LED can consume 60mA if we turn on all three colours at full power at the same time.
If we put a strip of 10 WS2812 LEDs it will consume a maximum of 600mA. Keep this in mind when thinking about the feeder you will use.
Mobile phone power supplies usually provide between 500 and 2000mA, check how much is yours and calculate how many LEDs you can connect to your feeder so as not to exceed its capacity.
At the end of this article you have a video tutorial with specific and detailed instructions for connection and configuration of LEDs. Although the video is very good for the practical part, I recommend that you first read the article because it has a lot of information that will help you to get the most out of your LEDs.
Diagram with connections from NodeMCU to WS2812 LEDs (Neopixel)
As I said, the connection couldn't be easier. Just three cables and you're off and running!
In this example I have used three WS2812B LEDs, but one of the great advantages of this type of LED is that you can use as many as you want. However, be aware of the power consumption, each LED can consume up to 60 mA..

ESPEasy configuration
Once you have made the connections, you have to configure ESPEasy to recognise the devices and include a few simple rules to behave the way we want them to behave.
I'll give you the example of the eMariete's homemade CO₂ meterbut you can use it in exactly the same way with any other project.
Basically, we will have to do the following:
- Activating the ESPEasy rules engine
- Add a rule so that when the ESP8266 is switched on, it is switched on with the LEDs off.
- Add a rule to change the colour of the LEDS depending on the CO2 level.
You do not need to register the LEDs as a device in the "Devices" tab.
Activating the ESPEasy rules engine
The first thing you should do is activate the ESPEasy rules engineif you have not already done so.
To do this, go to the "Tools(Tools) and click on the button " ".Advanced"(Advanced):

The ESPEasy advanced configuration options window will open.
There you have to activate the options "Rules"(Rules) and "Old Engine"(Old Engine):

Add a rule so that when it is switched on, the LEDs are switched off.
Now you have to write the rules, in the "Rules" tab (Rules). This tab will not appear until you enable the rules engine, as you have seen in the previous point:

In the rules editor that appears in ESPEasy, you write the following rules (I recommend you copy and paste, to avoid mistakes and leave comments - lines starting with // - which ESPEasy will ignore)..
You will need to replace Senseair#PPM with the device name and value you have chosen (in the "Devices" tab). In this screenshot the device name is CO2, so instead of Senseair#PPM we would write CO2#PPM:

On System#Boot do
  NeoPixelAll,0,0,0,0 // LEDS OFF
EndOn
The NeoPixelAll,0,0,0 line instructs ESPEasy to turn off all LEDS.
What this line really tells you is to put the Red to 0the Green to 0 and the Blue to 0.
As the line is NeoPixelAll,0,0,0,0 between "a block"formed by the line On System#Boot do y EndOn, we tell ESPEasy to run it when the NodeMCU starts up (anything you put inside that block will be run each time the NodeMCU is switched on).
Add a rule to change the colour of the LEDS depending on the CO2 level.
Now add this other block to the rules:
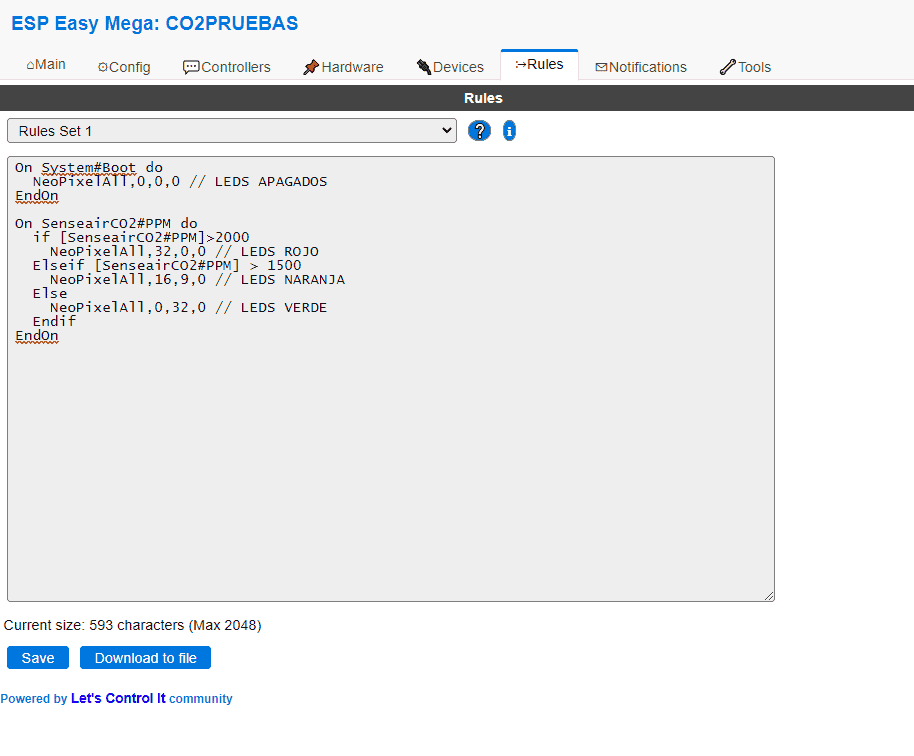
On SenseairCO2#PPM do
  if [SenseairCO2#PPM]>2000
    NeoPixelAll,32,0,0,0 // RED LEDS
  do if [SenseairCO2#PPM] > 1500
    NeoPixelAll,16,9,0 // ORANGE LEDS
  Else
    NeoPixelAll,0,32,0 // GREEN LEDS
  Endif
endon
This block instructs ESPEasy to each time it receives a new value from the SenseairCO2 sensor (On SenseairCO2#PPM do), check the following:
if the value of SenseairCO2#PPM is greater than 2000 and, if soIf the LEDs in the strip are not on, turn on all the LEDs in the strip with the following values: Red at 32the Green to 0 and the Blue to 0.
if not complied with the above (that the value of SenseairCO2#PPM is greater than 2000), it will check if the value is greater than 1500 and, if it is met, turn on all LEDs in the strip with the following values: Red to 16the Green to 9 and the Blue to 0 (a yellow/orange).
if not complied with the above (that the value of SenseairCO2#PPM is greater than 1500), and without further checks, it will light all the LEDs in the strip with the following values: Red a 0, the Green to 32 and the Blue to 0.
the line endon ends the block of checks that started with On SenseairCO2#PPM do.
The final resultshould be similar to this one:

Control the switching on and off of the LEDs with a switch and have them flash on and off at certain times and that, and that, and that, and that....
The possibilities of the ESP-Easy rules are enormous, and allow us to do almost anything…
What if you wanted the LEDs to be switched on at the same time? flashing and that they were also switched off between certain hoursfor example, so that they do not disturb, and furthermore control with a switch (or a push button) whether or not to turn them on or off. (bonus: and that in addition if we have an OLED screen connected, it will also switch off.?
We could use this variation of the rules from the previous point in which we would include some timers to create the intermittency and some extra checks of the hours and a Switch that we would connect (between pin D7 and GND, in this case):
On Rules#Timer=1 do
  if [Switch#State]=1 and [var#1]=0 // If the switch is on and it is not sleep time
    if [co2#co2]>1000
      NeoPixelAll,32,0,0,0 // RED LEDS
    if [co2#co2]>750
      NeoPixelAll,16,9,0 // LEDS ORANGE
    Elseif [co2#co2]>400
      NeoPixelAll,0,32,0 // GREEN LEDS
    Else
      NeoPixelAll,0,0,0,0 // OFF LEDS
    Endif
  Endif
  looptimerset_ms,2,100 //on 100ms every 2 secs
Endon

On rules#Timer=2 do
  NeoPixelAll,0,0,0,0 //led off
  looptimerset_ms,2,0
  timerset,1,2
endon

On System#Boot do
  NeoPixelAll,0,0,0,0 // LEDS OFF!
  Let,1,0 // If set to 1 = sleep time, LEDs off!
  timerSet,1,2 // change the 2 to 60sec and the LEDs will turn on with the first measurement
EndOn

on Switch#State do
  if [Switch#State]=0
    oledframedcmd,display,off
    NeoPixelAll,0,0,0,0 // OFF LEDs
  else
    oledframedcmd,display,on
    Let,1,0,0 // If 0 = no sleep time, LEDs on!
  endif
endon


on Clock#Time=All,22:00 do
  Let,1,1 // If set to 1 = bedtime, leds off!
  NeoPixelAll,0,0,0,0
  oledframedcmd,display,off
endon

on Clock#Time=All,08:00 do
  Let,1,0 // If 0 = no sleep time, leds on!
  oledframedcmd,display,on
endon
In this example, the LEDs and OLED display would remain off every day from 22:00 to 08:00.
You can "cancel" that SLEEP TIME switching off and on again from the switch.
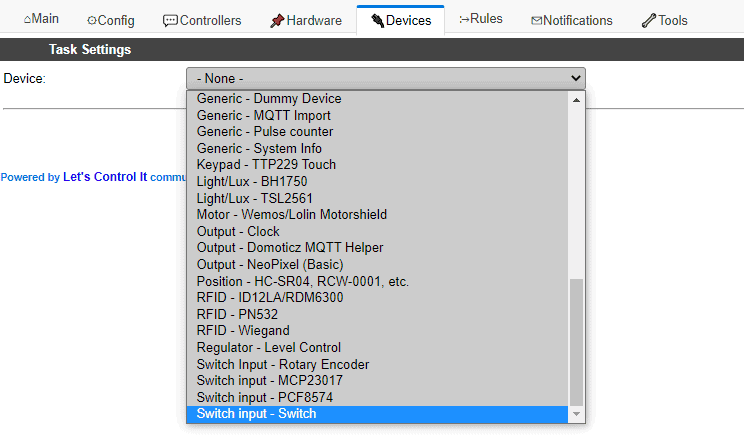
All you have to do is connect the switch (on pin D7 in this example, although you could use other pins), add it as a new device of type "Switch":

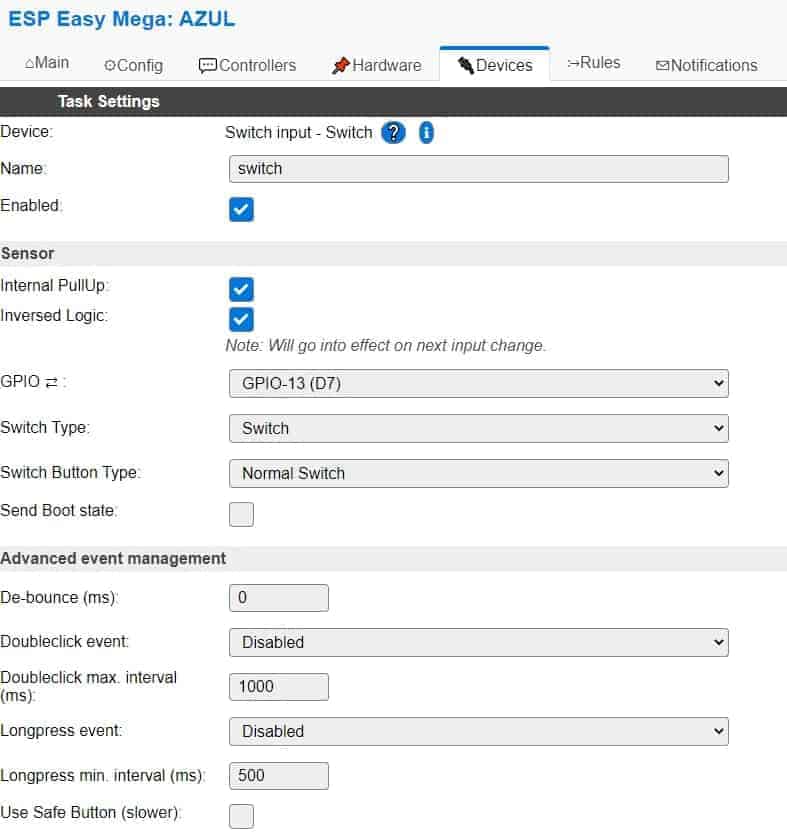
and configure it:

If you prefer, you can use a push button instead of a switch. You would only have to change the type of button and say that it is a low-level active push button (which is activated when pin D7 is tied to GND):

Many thanks to user Joselu70 for participating in the development of these rules 😉.
Adding a ruler to make an LED traffic light
With the WS2812 LEDs it is possible to create, for example, a traffic light effectin which, with a three LED stripThe first LED of the strip, placed vertically, can be switched on at greenthe second in orange and the third in red, depending on the CO2 level or any other value.
The command to send for switch on a specific LED of the strip is:
NeoPixel, NumeroLed, RedQuantity, QuantityDeVerde, QuantityDeAzul
Being NumeroLed the position of the LED we want to control in the strip, and the amount of red, green and blue in the strip. number between 0 (off) and 255 (on at 100% intensity).
For the first LED lights red (at 50% intensity, for example, as 100% is too strong for my taste) we would use the command:
NeoPixel,1,128,0,0,0
For the second LED lights up amber (at 50% intensity), we could do this by adding a 25% of red plus a 12% of green. To achieve this we would use the command:
NeoPixel,2,64,32,0
For the third LED lights up green (at 50% intensity), we would use the command:
NeoPixel,3,0,0,64,0
The rule we should include would be this:
On SenseairCO2#PPM do
  if [SenseairCO2#PPM]>900
    NeoPixelAll,0,0,0 // TURN OFF THE LEDs
    NeoPixel,1,128,0,0,0 // TURN ON THE FIRST LED IN RED
  Elseif [SenseairCO2#PPM] > 800
    NeoPixelAll,0,0,0,0 // TURN OFF THE LEDs
    NeoPixel,2,64,32,0 // WE TURN THE SECOND LED ORANGE
  Else
    NeoPixelAll,0,0,0,0 // WE TURN OFF THE LEDs
    NeoPixel,3,0,0,64,0 // WE TURN THE THIRD LED GREEN
  Endif
endon
I have chosen the CO2 levels so that the traffic light will turn red when 900 ppm is exceeded (in accordance with RITE IDA 2 for classrooms, suitable for school classrooms). Feel free to replace the 900 and 700 values with the ones that suit you best.
Depending on which distance and the brightness of the room, you can adjust the intensity of the LEDs (one of these LEDs switched on to the maximum value of 255, you will see the LEDs in the room). much).
As you will see before turning on each LED first we switch off the entire stripusing the command NeoPixelAll,0,0,0,0 because, if we did not do so, when changing colour (e.g. from green to orange), both LEDs would remain lit.

This type of LEDS is perfect for making traffic lights and other indicators. Better than strips because can be used together or can be separated individually.
Much better than LED strips, which give much less flexibility.
Step-by-step video tutorial
Although the assembly and configuration is very simple, in the following video you have specific and detailed instructions for connection and configuration of LEDs from minute 21:35 onwards.
In it you will find explanations, details and tips of all kinds.
Press play and go to minute 21:35which is where the detailed explanation of LEDs begins.